

Spring and summer are the perfect seasons to start thinking about chicks. Why not expand your homestead flock with some new little babies? Chickens are some of the easiest farm animals to raise, and even if you don’t live in the country, some cities will allow homeowners to keep a small backyard flock.
I approach raising chicks with the same mentality as I approach growing garden seedlings: A healthy start results in a healthy bird. In my experience, chickens purchased from a local hardware or tractor supply store are inexpensive, but they tend to be rather unhealthy, so I prefer to purchase and pick them up from a local hatchery.
Our local hatchery is reputable and ships chicks nationwide. If you pick them up in person, however, you save chicks the stressful and sometimes fatal experience of traveling through the mail. If pickup is not an option and you choose to order your chicks by mail, you may consider opening the box alone so young children don’t have to deal with any dead chicks. It may also be a good idea not to let your young children know how many chicks were ordered so the problem of a missing chick(s) doesn’t even need to be addressed.
Set up your nursery or brooder before the arrival of your little flock. Brooders don’t need to be elaborate — you can set one up in an afternoon with materials at home and/or a few inexpensive ones.
The Essentials in a DIY Brooder
You will need:
A heat lamp with a clamp or other means of raising and lowering.
A small feeder and waterer. I recommend the type where the base screws on to a plastic or glass dispenser. Consider having two of each to make for easier cleanup.
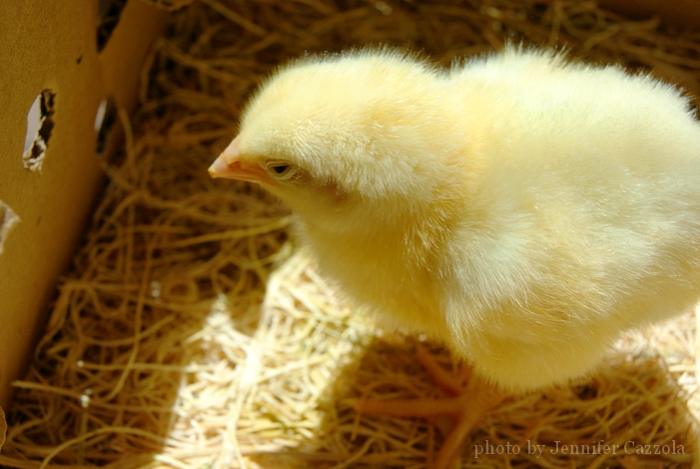
A large container with steep sides for housing the chicks. This can be as simple as a large cardboard box or a plastic wading pool. I prefer a large plastic tub with handles. The container should have rounded corners so the chickens don’t get smothered in a corner and deep enough that chicks can’t get out and curious pets or children can’t get in.
Some sort of absorbent litter to line the bottom of the brooder. Peat moss, shredded paper, newspaper, or paper towels will all work. Whatever you use, make sure that it will provide traction for their tiny feet in order to avoid a condition called spraddle (or splay) leg.
A screen for the top of the brooder protects the chicks from any accidents with the heat lamp (yes, mine did come loose one morning) and keeps any pets or little hands out of the brooder.
Purchase a starter feed for your chicks, which is specially-formulated for their growth during this time period. If you are concerned about GMOs and other unwanted ingredients, Scratch and Peck has an organic non-GMO starter feed. You will also need chick grit, a smaller grade grit easier for the chicks to handle.
When You First Get Them Home
When your chicks arrive home, gently teach them to drink by dipping their beak into the water. They will almost immediately respond with their own version of “swallowing”. With my first batch of chicks, they all looked alike and soon began milling about the brooder. It was difficult to tell who had had a drink and who hadn’t, but they learn very quickly from each other, so don’t stress out if you find yourself in the same scenario.
Make sure the feeder is full, but also scatter some feed around the bottom of the brooder since they won’t immediately connect “brooder” with “food”. I put a small amount of food on a paper towel close to the feeder and within a very short time they know where to eat. Scatter the grit with the feed, or provide a small amount inside a jar lid next to the food. When you are sure the chicks are drinking and eating, turn on the heat lamp and cover the brooder with the screen.
The First Few Weeks
In the first few weeks, the chicks should have constant access to food, water, and heat. Keep the brooder at the very warm temperature of 95 degrees Fahrenheit, but also create an area where the heat is less intense — fix the lamp at the far end of the brooder so chicks can come and go under the warmth as they need.
The general rule of thumb is to raise the lamp each week, reducing the temperature of the brooder by five degrees with each move. The first time I raised chicks, I tried really hard to follow this rule, but struggled to get it exact.
In the end I watched my chicks and let them be my guide. If they were panting, they were too warm. If they were peeping loudly and huddled together, they were too cold. If they were quietly peeping, eating, drinking, and sleeping, they were fine.
Monitor the brooder for cleanliness until your chicks have feathered out and are ready for the outdoor coop. I change the litter on a daily basis and keep the sides of the brooder clean. Also, make sure that food and water are kept free of droppings. I change out the water two or three times a day, and keep the feeder full so there is constant access to clean food.
When I clean my brooder, I remove each chick one at a time and put them in a cardboard box. I use this time to hold and talk to them, getting them used to human interaction.
This is also a good time to inspect the vent of each chick to make sure it is free of droppings that, if left unattended, can stick, harden, and seal the vent shut. This condition is commonly referred to as “pasty butt” and can be deadly. If you happen to find a dirty vent, gently wipe it clean with a warm, wet cloth and dry.
After about a week, the chicks start to feather out. At this time, mine begin flitting around the brooder and rarely stay put inside the box during cleaning time.
My husband takes this as his cue to install a tiny roost bar inside the brooder, which isn’t strictly necessary, but it is fun to watch them “practice” roosting and it gives them something to do. If you add this feature to your nursery, locate it away from their food and water so they (and their supplies) stay clean.
Graduating to the Outdoors and the Coop
When my chicks are about three to four weeks old, I take them outside every so often to introduce them to the great outdoors. This is a gradual exposure to the elements, so I’m careful not to overdo it. The weather should be warm and not too windy. Provide some sort of protective covering and monitor them frequently.
I put mine in a large tractor covered with chicken wire, and then put a small box inside where they can get out of the sun. I also make sure they have a continuous supply of water. They should scratch, mill about, and sleep. We begin with about one hour of outside time, increasing it as they develop and their feathers began to come in. Just before I transfer them to the outside coop permanently, I let them stay outside in the tractor all day and for a short time after dark.
When I graduate my chicks from the brooder to the coop, I set them inside the coop for an afternoon or two, letting them know that this is home. Again, I’ll make sure the weather is warm, the coop is well-ventilated, and they have access to food and water. After a few days of “coop training” I’ll simply leave them in overnight. They are now moving into the growing phase as they prepare to reward all of your hard work with fresh eggs.
You can put away your brooder supplies, but keep them handy. Raising chicks is a fun and rewarding experience — one you’ll want to make a regular part of your annual homestead routine.
What are your tips on caring for chicks? Any fun or interesting experiences to share?
...without giving up the foods you love or spending all day in the kitchen!

2 free books:
Eat God's Way
Ditch the Standard American Diet, get healthier & happier, and save money on groceries...
We only recommend products and services we wholeheartedly endorse. This post may contain special links through which we earn a small commission if you make a purchase (though your price is the same).

I also have the brooder light on before going to the post office, but once the post office calls, I put an old sock filled with rice (tied at the end) in the microwave for 3 to 4 minutes. The chicks lay on it and fall asleep after their long hard journey. The heat lamp helps to keep it warm. I use clean river sand for chick grit. I also feed some small mealworms and kefir when they are about 1 week old. I also dig up a small patch of pasture grass with dirt/roots. This gets them used to bacteria on the property. I add a small amount of raw apple cider vinegar steeped with cayenne peppers to their water. The cayenne helps with circulation to the heart, veins and arteries. Ginger opens up circulation to feet, head, wings.
Heather thank you for those suggestions! I had not thought to dig up a small patch of pasture. I’ll have to try that. They will all be a month old tomorrow and everyone is doing great.
In India they feed the chickens soya and grains??? What can I feed the chicks? Do let me know, as I don’t want to feed them soya or corn. What is the chick feed made up of?
Veronica I’m not an expert in making my own chick feed but chickens do need a certain amount of grain. If your corn is not GMO I would not be concerned. It is important that the starter feed have a mixture of grains, protein, vitamins, and minerals. The starter that I give to my chicks has a mixture of organic peas, wheat, and barley, linseed meal, fish meal, and flax oil (among other things).
Holly Tomlinson FYI
Someday… Can’t have them here in town, but I WILL have chickens when we move to the place where we’ll retire!
I have chickens that will soon be laying eggs I have one chicken that has laid about 4 eggs so far but not every day though. This is my first time to ever have chickens so it is such a learning experience. I’m just wondering how to keep the chickens from eating the eggs I found one chicken egging an egg yesterday. I read to put up an curtain in front go their nesting boxes will that really work ? When should I expected the other chickens to start laying ? They are almost 18 weeks old and they are free range but I have been checking where they have been roaming and have found nothing except for one soft shell egg please any suggests and advice would be greatly appreciated.
Melissa
Melissa, I do not have a lot of firsthand experience with egg eaters but I know it can be because eggs get broken in the nest due to overcrowding, or it can be because of a nutritional deficiency that causes soft shells that break easily.
I would expect your chickens to start laying at 20 weeks, but it may take a while for it to become regular. Here is a post that I wrote on our first egg:
https://traditionalcookingschool.com/2014/02/24/our-first-egg-plus-handling-and-care-tips/