If you’re making pressed cheeses, such as cheddar, then yes — you do need a press. I bet that’s no surprise! But do you need an official cheese press? No.
I give the same answer to those taking the Cultured Dairy & Basic Cheese eCourse. With only two or three pressed recipes among the bunch, there’s no need to purchase or make an official press. You may want one, and that’s fine — go for it! But if you’re unsure, I figure you may as well explore cheesemaking before making that decision.
DIY Cheese Press: Tome Mold and Lid

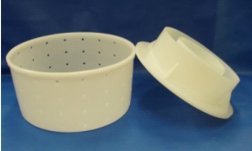
A simple tome mold and lid (around $20) work great as a DIY press. The lid is dual purpose, acting as the follower as well. See those rings coming up off the lid? Those are the followers, which connect the weight system with the top of the cheese — you put weight on the rings and it will press down on the lid, which will press the cheese.
This tome mold accommodates up to a 3 pound wheel of cheese of a nice 7-1/2″ diameter. It can also do 1 and 2 pound wheels, too! A gallon of milk usually yields about a pound of cheese, give or take, depending on quality of milk.
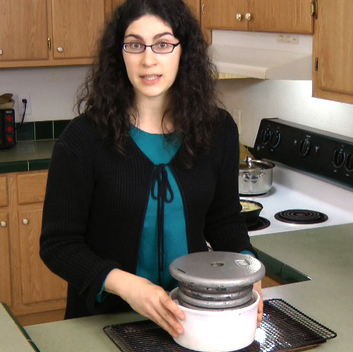
To complete this budget “cheese press” you also need: free weights*, a wire rack, and a baking sheet to act as a drip tray. (*Or use a big jug filled with water or heavy canned goods.)

The video screenshot above shows my tome mold setup. I’m still working on finding a stainless steel, sturdy wire rack. Here’s how this works as a press.
- Set the clean mold on top of a wire rack over a baking tray.
- Line the mold with cheesecloth (I use 90-count).
- Fill the mold with cheese curds, packed closely together as much as possible.
- Wrap the cheesecloth back over the top of the curds neatly.
- Put the lid in the mold on top of the curds/cheesecloth with the following rings facing up.
- Tuck the cheesecloth in the top of the mold so the whey won’t drip out over the counter.
- Add weight(s) to the lid/follower. Start with light weights and increase over time according to the recipe directions (or your preferences).
- After about a half hour, remove weights. Flip the cheese over. Add weights back. This is called “redressing” and it ensures a pretty cheese with a smooth top!
- When pressing is done, transfer the pressed cheese to a rack overnight. Age, or eat, as desired.
Sources for Tome Mold & Lid
The featured tome mold and lid are included in the specially-created and discounted supply kits for the Cultured Dairy & Basic Cheese eCourse. You can purchase a kit at either Homesteader Supply or Cultures for Health, for 10% to 25% savings off retail. You can also buy the tome mold and lid separately, here.
I trust and recommend both these merchants — Julie from Cultures for Heath, and Jerri from Homesteader Supply. I have had the pleasure of doing business with them for a few years. Both are responsive, helpful, and kind. Julie and Jerri have each have gone out of their way to source things I need.
What’s Next?
I won’t argue — having an official cheese press is very nice. 🙂 Next up: I’ll review some ready-to-go cheese presses.
Have you made a homemade cheese press, either this style or more dressed up? I’d like to collect your ideas for a future post — so please share!
...without giving up the foods you love or spending all day in the kitchen!

2 free books:
Eat God's Way
Ditch the Standard American Diet, get healthier & happier, and save money on groceries...
We only recommend products and services we wholeheartedly endorse. This post may contain special links through which we earn a small commission if you make a purchase (though your price is the same).


I usually just put my curds in the cheese cloth, twist it all up, and then set the ball of draining curd on a colander, in a big pot, with a jug of water sitting on top. not at all fancy. It mostly works. But so far i only make farmers cheese in this fashion – need to buy me some cultures and start making REAL cheese!
That’s a great way to do non-pressed cheese. I had not thought to put a jug on top of a setup like that. Thanks, Miranda! 🙂
Wardee,
I can’t wait to see your reviews of the presses. I’ve been going over all this in my head and I just can’t figure out what to buy. I don’t have free weights around so I figure by the time I buy the tome mold, a drip pan, a rack, and weights, I’m almost to the cost of the middle ground press. I’m curious what your thoughts are about the stainless steel vs plastic. I try to avoid plastic but I read in the ecourse notes that some cheese makers stay away from the stainless because it cools the cheese down too quickly. I’m the type of person that likes the right tool for the job; if something is a big giant pain every time I go to use it, I’m much less likely to use it. But, I don’t want to spend the money on a fancy pants press, if it has it’s own set of drawbacks. I’m so torn if you can’t tell. 🙂 I can’t wait to start class! I know it’s going to be so fantastic because you did such a wonderful job with the fundamentals and sourdough ecourses!
Katie — Here are my reviews! I hope it helps. Be sure to let me know if you have any questions.
https://traditionalcookingschool.com/2011/01/21/cheese-press-reviews/
Yeah i agree mom you have to have a Cheese press. Or else your cheese doesn’t work. That wouldn’t be good at all. anyway good post mom.
I haven’t yet ventured from soft cheeses, the main reason being that it seemed like such a huge investment to get a cheese press when you really had no idea how well it would work. Given the difficulty of access to good cheese making milk, it seemed like a big risk. That and the scares about perfect sterilization the cheese books have, particularly about aged cheeses. Something I’m not sure with my lab around I could achieve. But, the biggest issue has been the press. Thanks for the great info. Once I fully master mozzarella, maybe I’ll give it a shot.
At what temperature do some cheeses need to be aged? Before I invest in the equipment, I want to know if I can make all the cheeses at my own home. My basement temperature is not always 50 degrees.
I bought a cheap press and regretted it enough to return it and buy a good one from New England Cheesemaking. It was expensive, but high quality and worth the price!
Hi, what kind of cheeses do you make with this method please? I am a beginner and just making soft rind cheeses camembert, mozzarella. Thanks
I do semi-hard cheeses like queso fresco and cheddar. For the soft cheeses you’re making you don’t need a press.
I’m wondering about the cheese curds .. where do you get them ..or do you make the yourself?
Do you have to use raw milk?
Hi Margaret,
We make the cheese curds.They are so good! Here is a recipe on the blog for homemade cheddar using raw milk: https://traditionalcookingschool.com/2010/09/22/homemade-raw-cheddar-cheese/.com/2010/09/22/homemade-raw-cheddar-cheese/
The curds are what you have before you press the cheese. You can make cheddar using pasteurized milk. We have information on how to do this in our Cultured Dairy eBook:https://traditionalcookingschool.com/tcs/cultured-dairy-ebook/ or the eCourse: https://traditionalcookingschool.com/lp/
Millie
Traditional Cooking School
So, I’m just getting into cheese making and over the last couple of weeks have made two DIY cheese presses. I’ve detailed this below:
The first was using the glass out a cafetiere, the stainless steel filter section from the cafetiere, a pint glass (which fit perfectly inside the cafetiere with no gap) and a pan to catch the whey. I put the cheese curd in the bottom of the cafetiere, put the steel in on top fo the curds, slid the pint glass down inside the coffee jug (the rim of the steel filter section rested perfectly on the rim of the pint glass) and then upended the whole thing so the way would drip down past the pint glass, or into the pint glass. I then loaded 18kg of weight onto the bottom of the cafetiere. I wouldn’t really recommend this, but it was a good test of the strength of glass. It worked, and I came away with quite a nice garlic cheese log.
The second I’ve made is a bit more sturdy. I’ve used a 6 inch diameter cake tin, a 7 inch diameter steamer, and a honey tin lid (from a 5kg tin, think paint tin lid…the size of it slots perfectly into the 6″ cake tin). I used a nail to put some holes in the honey tin lid and the bottom of the cake tin. I used some stainless steel spacers (dimensions: 5cm x 2cm) to act as “legs” to rest the honey tin lid on. So, to put it together:
I place the steamer tray into the steamer pan. I put the four spacers (legs) evenly inside the steamer tray. I line the cake tin with my cheese cloth, put the curd in on top of the cheese cloth and fold the cloth over the curd so that when I press the cheese the cloth will between the cheese and the steel walls. I then put the honey tin lid into the cake tin on top of the curds and give it a little press down so that it sticks a bit. I then upend this onto the “legs” inside the steamer tray, being careful not to catch any of the cheese cloth so that it remains even. I then put weights on top of the cake tin so it presses the cheese into the honey tin lid. The “legs” are needed so the honey tin lid can push up into the cake tin. The steamer tray allows the whey to drip through into the steamer pan, so it can be used later. This is a bit more robust and currently has 30kg sat on top of a saffron and black pepper cheese wheel.
Hi, Mr. Magneto,
Wow! Thank you for sharing. Absolutely amazing. 🙂
~Peggy, TCS Customer Success Team