As much as I’d love to have a green thumb, I don’t, so I try my hardest and glean as much wisdom as I can from posts such as these. My GNOWFGLINS team members have amazing gardening tips and pointers, and with the Lord’s blessings, we always have a bountiful harvest here at Hickory Cove Farm!
But while I’m no expert on gardening, I do enjoy making and creating. 😉
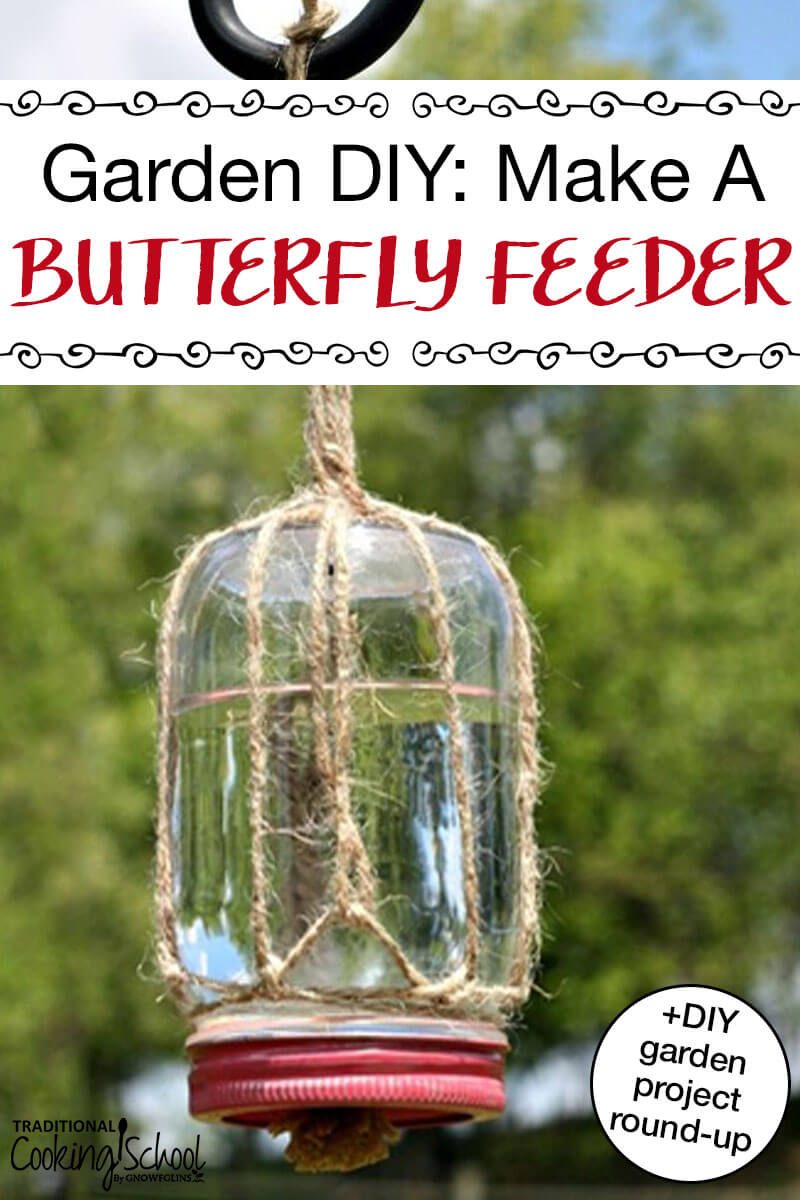
Here’s how to make a DIY butterfly feeder that makes a wonderful addition to any garden or flower bed. Records show that the numbers of butterflies, bees, and other pollinators are declining, so they really need our help! This simple feeder, made from a mason jar, some twine, and a piece of sponge, will help attract these friendly insects to your garden and give them a place to refuel. It’s a win-win!
How to Make a Butterfly Feeder
Step 1: Gather Your Supplies
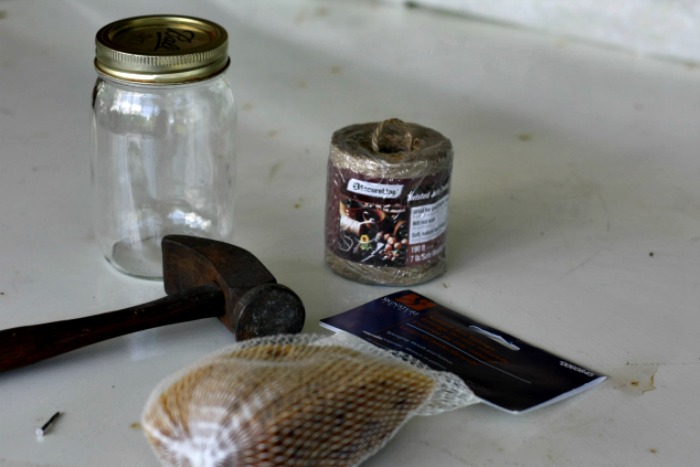
- 1 pint-sized regular-mouth Mason jar
- jute twine
- 1 hammer
- 1 nail
- 1 natural sea sponge*
- paint (optional)
*Since butterflies and other insects will be feeding from the sponge, I use a natural sea sponge instead of a dyed, synthetic kitchen sponge. However, either option works for the project.
Decide if you would like to paint your jar, lid, or both. I chose to apply a coat of watermelon-pink spray paint to the lid, since it’s said that pollinators are attracted to colors of the red spectrum. I wanted to easily see when the feeder needed a refill, though, so I left the actual jar unpainted.
Step 2: Punch It!
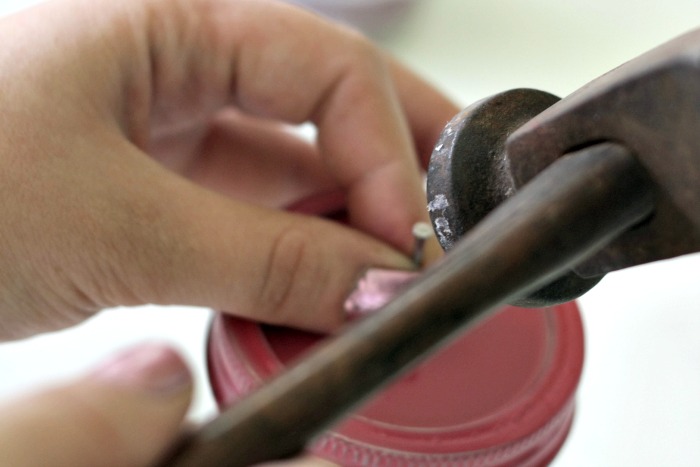
Put the canning lid on the jar and screw on the ring. Then use the hammer and nail to punch a hole in the center of the lid. One or two gentle taps with the hammer should do the trick!
Step 3: The Tricky Part — Thread the Sponge
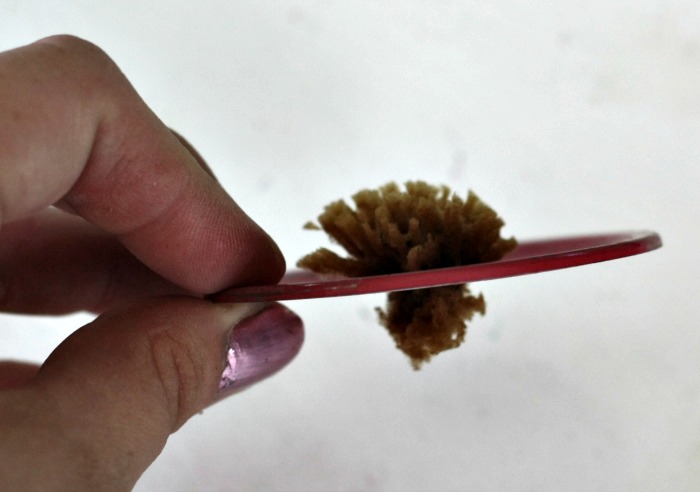
Cut a small piece of sponge that’s about 1 or 2 square inches. This next part is the most difficult: you need to get the sponge through the small hole, which isn’t quite as easy at it seems! I poked the sponge into the hole, from the painted side, with a pair of bent tweezers then gently tugged it through from the inside. It takes some patience, but it can be done! It also helps to wet the sponge. Pull it through until there is 1/4 to 1/2 of the sponge on the inside.
Step 4: Make the Hanger
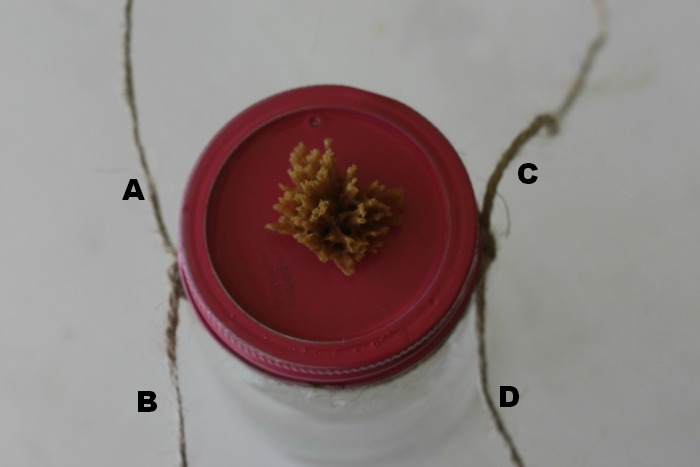
Cut two pieces of twine, each 6 to 8 inches in length. Tie them around the mouth of the jar so there is a knot on either side, as shown in the picture above. There will be two pieces of twine going around the jar now.
Bring string “B” around to the front of the jar. Loop string “B” through the bottom piece of twine that circles the jar. Pull it all the way through, then loop it up and back through the top twine that circles the jar. Tie a slip knot in string “B” before pulling it tight against the jar. Hopefully the photos below will help visualize those directions!
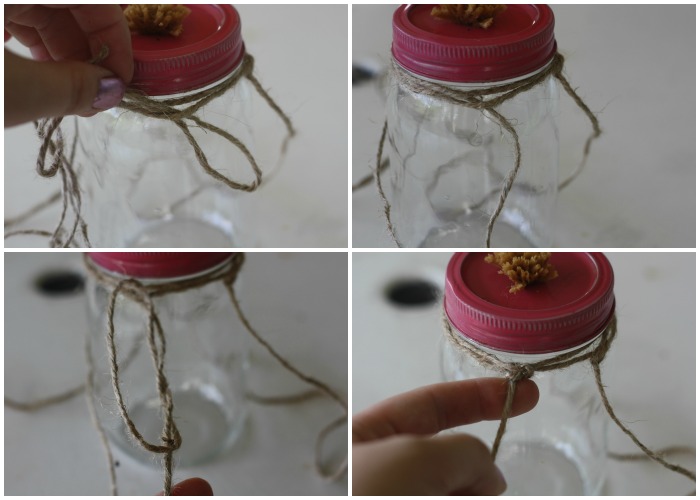
Do the same thing on the other side of the jar, this time using string “C”. When you’re finished, strings “A” and “D” should be in their original places, and strings “B” and “C” should be opposite each other on the other two sides of the jar, like in the photo below.
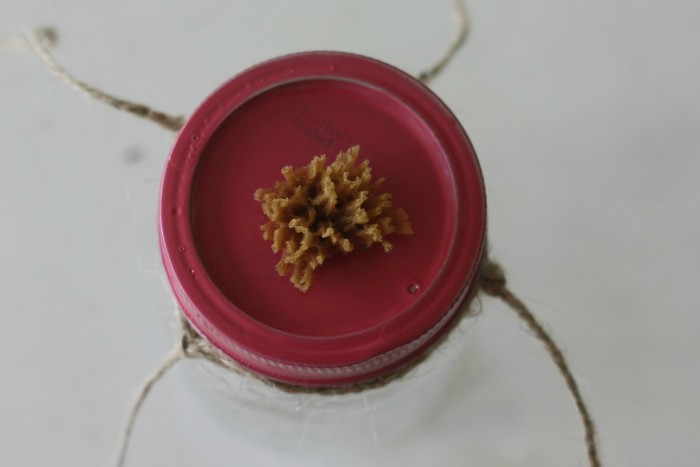
Now, flip the jar over and bring strings “A” and “D” to the bottom of the jar (when the jar is upside down, this actually becomes the top). Tie tightly at the center base of the jar. Bring the other two strings to the bottom of the jar and tie tightly over and around the knot that’s already there.
At this point, you can do one of two things. 1) You can tie all four strings together into one final hanging loop, –OR– 2) you can take each string back to the top of the jar (where the lid and sponge are) and loop them through the strings that we tied around the mouth of the jar, then bring them all back to the top and tie them all together into a hanging loop.
I did method #2. No matter which you choose, when you’re done, snip off most of the extra twine.
Step 5: Fill and Hang!

Make a butterfly nectar solution by mixing 1 part pure cane sugar to 9 parts water. Heat mixture until sugar is dissolved. Cool, and pour into your feeder. Pinch the sponge together a few times to make sure the nectar is soaking through. Hang feeder from a shepherd’s hook, tree branch, or other hanger and wait for the butterflies and bees to discover it!
Bonus: DIY Garden Project Round-Up!
Are you looking for more fun ways to decorate your garden space with useful, fun projects? Check out some of these!
Are you handy with a saw, a hammer, and some nails? Here are some plans and instructions for building your own butterfly house.
Ladybugs are the gardener’s friend! Make this simple ladybug habitat to give them a place to rest when they aren’t busy eating your garden pests.
Need some help to remember what you planted and where? Here are 27 ideas for cute plant markers. Some of these would make a great project to keep your kiddoes busy!
Wooden pallets are wonderful to repurpose into all sorts of useful things. If you’re looking for a weekend project, this potting table made from pallets might be just the ticket!
If you feel at home behind a sewing machine, check out this gardening apron and bucket caddy set made from an old pair of jeans. And I love this pretty gathering apron — so clever!
Do you have any gardening related DIY projects to share?
We only recommend products and services we wholeheartedly endorse. This post may contain special links through which we earn a small commission if you make a purchase (though your price is the same).


Awesome article Lindsey. Can’t wait to make this one. My family and I just planted our very first garden ever. Im very excited to see what we grow! This will be a great addition to it 🙂
is sugar water the best thing to be feeding wild insects? I mean, it has no nutritional value, is not found in the wild as just plain sugar water. I just wonder if there is something better we could be feeding them. thanks
http://www.ecosystemgardening.com/is-sugar-bad-for-hummingbirds.html
That’s a great point! Pure (unrefined) cane sugar, which is what I recommend using here, may not be the very BEST thing to feed wild insects, but it does contain minerals that haven’t been extracted out by the refining process. I do not recommend using plain white (GMO, beet) table sugar though!
There are butterflies that are attracted to rotting fruit as well and if you put watermelon pieces, orange slices, apple slices and whatnot into a duet cake holder and hang, they love it!
Love this post and the fun project! I am wondering if I can include it on my blog in my Summer Herb Camp For Kids this summer?
I think it would make a great addition!
Thanks
Angela – You’re welcome to share a photo (with credit to Lindsey @ GNOWFGLINS) and 2-3 sentence excerpt, then refer your readers to this post to read the rest. Thanks – we appreciate it!
Loved the Butterfly jar
Bren,
I like to use hummingbird feed
The red dye and other chemicals in the red hummingbird feeder from the store is now known to cause harm to people and hummingbirds, so I avoid using that.
I can’t wait to make one of these! They would make a great gift for a gardening friend or family member.
I gave my daughter all my hummingbird feeders because she gets the birds but I don’t. I also gave her the store bought mix but that feeder was hardly ever used but the one she put the homemade syrup in was empty all the time. An easier way to do this would be to use a plastic drinking glass that has the top with the hole for the straw. I have one that has separated from the outside part but the lid still screws on tightly. I get really nervous having glass hanging on my feeder poles because of the” tree rats” that frequent my yard. I had a beautiful Jim Shore feeder that was glass & those darn squirrels hung on it & managed to break the glass. No more glass outside for me!
I think glass is more pleasing to the eye than hanging plastic drinking cups. But I agree , it needs to be strategically placed away from larger critters, perhaps on a very thin, delicate branch.
Adorable, but absolutely to difficult to get the sponge through the hole. I tried for an hour with no luck.
Oh no! You could try making the hole a bit bigger, and though it seems counter-intuitive, I found that it was a bit easier if I kept the sponge a bit wet.
I took fishing line and balled sponge tight took fishing line and pulled the sponge in hole a bit easier. Then I cut the line and the sponge opened up and filled the hole tightly. Carefully slide the line out and off sponge. Hold sponge in hole while doing this so you don’t pull out the sponge at the same time. Make sure you get all the line you don’t want to harm while feeding.
you could just use a kilick hitch or a jug knot to both pull the sponge through and hang the jar
im excited to be a part of this group. thanks for sharing those ideas.
How often would you suggest changing the solution? The hummingbird article (referenced above in someone’s comment) suggests every other day. I live in a dry climate where the summer temperatures range from 90-105.
Made one with the small hole as suggested but the sponge dries out. I made another with a bigger hole but then the water just drips out.
help?
Nope. Instructions regarding twine for hanging are not good.
I found the hanger instructions to be terrible. Only 6 inches of twine??
My jar feeder just keeps dripping food out of the sponge. What did I do wrong?
Mine too. Did you find a fix or did you just trash the project?
That’s a great point! Pure (unrefined) cane sugar, which is what I recommend using here, may not be the very BEST thing to feed wild insects, but it does contain minerals that haven’t been extracted out by the refining process. I do not recommend using plain white (GMO, beet) table sugar though!
Can you use pure sugarcane juice right out of the cane? I am in Costa Rica and have access to all the sugarcane I my want. Would that be the same as dissolved pure sugar or better for the insects?
Thanks
Cesar