Sandwiches are great, don’t get me wrong. But what man wants to eat a sandwich every day in his packed lunch? Or maybe he’s already long past sick of that and has resorted to spending precious dollars on eating out during his lunch hour. I will show you how — in less than 30 minutes each morning — you can provide him a healthy, warm lunch. You’ll either save him from the boredom of eating sandwiches every day, or from wasting precious dollars eating out.
A healthy, warm packed lunch is a possibility for almost every working man. And he doesn’t need a microwave! Perhaps your husband is out in the field all day, without access to a microwave. Perhaps your family, like ours, chooses not to use a microwave. Perhaps your husband’s office doesn’t have a microwave or it is always busy during lunch hour. Perhaps your husband has only a limited amount of time for lunch and doesn’t want to bother with reheating food — he wants it ready to go.
Here’s the solution for providing warm, healthy, varied, inexpensive lunches for your husband every day. He’ll love you and he’ll probably become the envy of the office!
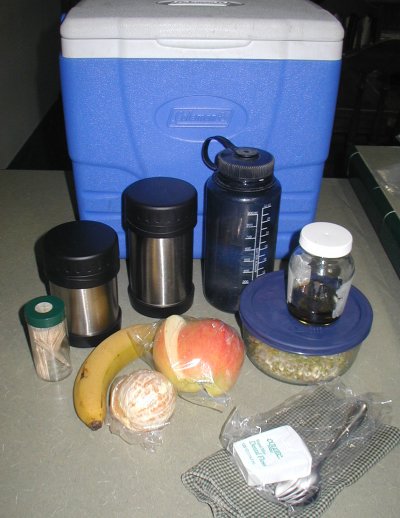
Start with these things, which I will explain more fully below:
- Cooler
- Square or rectangle glass or plastic travel containers, with lids
- Stainless steel water bottle (try greenfeet.com) (not pictured)
- Stainless steel insulated food jar(s) — 16-ounce or 12-ounce
- Ice pack — reusable, refreeze each night (not in picture)
- Main dish (from dinner before)
- Salad (from dinner before)
- Snacks — fresh fruit, muffins, dried fruit, nuts, etc.
- Glass eating bowl (optional)
- Silverware
- Napkin — preferably cloth
- Jar of toothpicks (optional)
- Travel container of mouthwash (optional)
The Cooler
Choose a hard cooler; they last longer and can take more beatings. Also, you won’t risk broken zippers. The cooler we have dedicated for my husband is about an 11-quart size. The outer dimensions are about 13″ wide (front) by 8″ wide (side) by 14″ tall. When selecting a cooler for purchase, I paid particular attention to the hinges. I didn’t want those thin, separate hinges that are screwed to the outside of the lid and body, because those tend to split over time. Instead, I chose a cooler where the lid fits into the walls of the body of the cooler and there appear to be some internal pins allowing the back corners of the lid to rotate up and down.
Glass or Plastic Food Containers
Glass containers will last longer and I believe they’re a healthier choice. You’ll need to shop around to find rectangular or square containers that stack well and make good use of space in the cooler. Plastic containers should never be filled with hot food, or else the plastic may melt and share its particles with the eater via the food.
Prepare plenty of dinner each night and those leftovers will become the main dish of your husband’s lunch the next day. No extra cooking, just some planning ahead.
In the morning when packing the lunch, heat about two cups of the leftover main dish in a small saucepan on the stove, adding a little water if necessary. Adjust the amount based on the size of your insulated food jar; two cups is what my 16-ounce food jar will hold. While the main dish is heating, temper the food jar by filling it with boiling or very hot water. After about five minutes or when the leftovers are sufficiently heated (try to time the two events to coincide), pour the water out of the food jar and put the main dish in it. Screw the lid on right away.
I will share one word of caution which I learned through my husband’s experience. He doesn’t prefer the food in the jar to be boiling hot. He only has one-half hour for lunch and doesn’t want to use up half of it waiting for the food to cool down — nor does he like a burned tongue! So, don’t heat the food too much. But on the other hand, make sure it is heated enough or it will be cold come lunch time. In addition, about once a week, I recommend filling the jar and lid with a soapy-vinegar-water mixture, to keep it smelling fresh.
If the main dish includes noodles, include those separately. They tend to get mushy sitting in moisture all day. In this case, make sure the main dish filling the food jar is added when it is quite hot because when your husband combines the noodles with it, the noodles will warm up a bit while the main dish cools off some. Don’t forget to include a bowl out of which he can eat after combining the noodles with the hot dish.
You can use additional insulated food jars for other hot items, such as steamed veggies or a cooked vegetable dish. Use another of the 16-ounce size food jars or get a smaller one, such as a 12-ounce, which holds 1-1/2 cups of food.
There may be days that you’re giving your husband a cold lunch, such as a cold grain salad and cold chicken, or sandwich fixings. On those days, don’t use food jars, but use glass or plastic food containers as described above.
The Salad
When you make a salad for dinner, prepare extra of this also. Combine all the dry vegetable ingredients in one of the glass or plastic travel containers. Don’t add the wet ingredients (such as tomato wedges or dressing) until the morning when packing the entire lunch in the cooler.
Snacks
Fresh fruit, dried fruit, nuts, seeds, and healthy muffins make excellent snacks. Pack enough so he’ll have something to munch on in the morning and the afternoon. These healthy options will help keep his blood sugar stable and keep his energy up. When we’re really hungry or stressed, we tend to binge on junk food. By providing healthy alternatives for snacking sensibly throughout the day, you’ll be helping him stay balanced and healthy.
Cut up fruit (such as melon) can be put in another of the glass or plastic containers. Whole fruits can be left whole and stacked on top of everything else in the cooler. Little items like muffins and trail mixes can be packed in sandwich baggies or little paper bags.
Put it All Together
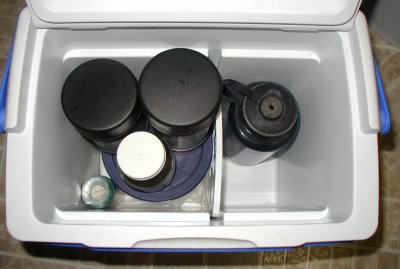 Take the main dish, salad, snacks, water bottle, silverware, bowl, napkin, toothpicks, and mouthwash and pack it all up. I will share pictures of how all this fits in my husband’s cooler. The actual placement varies from day to day depending on the food I pack for him, but it generally looks similar to this.
I do use the divider that came with this cooler because it creates comparments that make sense in how I pack his lunch. On the left side of the divider is all the food and related eating utensils. I stack (from the bottom up): ice pack, glass containers with fruit and salad, and food jar. In front of those, I slip a spice jar filled with toothpicks (it has the green lid with white sticker) and a clean fork and spoon.
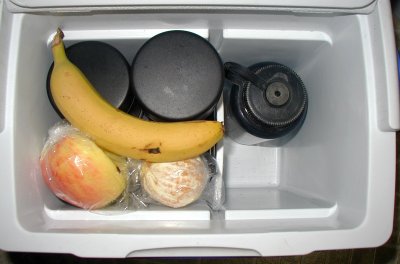 On the right side of the divider, I put his water bottle (plastic shown, though it has since been replaced by stainless steel). The space in front of the water bottle is where he packs his miscellaneous, non-lunch related items, like his digital camera, phone, and a little zip up pouch of other items he needs when out in the field with work.
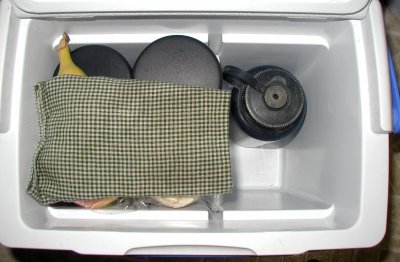
Back on the left side of the divider, I pile up his snacks, which is usually just fruit, lots of fruit. I sometimes wrap his cloth napkin around the fruit to protect it.
 I follow this process each week-day morning, while making porridge for our breakfast, in about half an hour. So, both breakfast and lunch for him in 30 minutes. And remember, no microwave required!
© Copyright 2007-2008 by Wardee Harmon
We only recommend products and services we wholeheartedly endorse. This post may contain special links through which we earn a small commission if you make a purchase (though your price is the same).

Ooo thanks! 😛
Loved the article. Where does one get stainless steel insulated food jars? Lucky husband!
I got them at a Walmart type store that is local to the PacificNorthwest, called Bi-Mart. The 2 jars were $10 for both, I think, maybe $12. If you search the internet, you’re bound to get lots of hits!
This is a great thing Wardee! Can you come and convince dh to let me pack his lunch more?
Sure, Jen! Just let me know when. 😉
Wardee, I do pack lunches a lot like yours. Except hubby has access to a microwave and uses that at work. The kids and I use the stainless steel food jars (bought at Target) for school lunches. I have been eye-balling the Lexan water bottles. Are they really durable? I have cheap plastic bottles for the kids with a cover to keep cool. For me, I have a stainless steel container. The kids would need a cooler cover for the bottles. What is your advice? 😀
Michelle, the Lexan bottles are very durable. C. is the one who drops his and it has never broken. They are really strong.
I can’t advise you on covers for them, as we never use them. I’m not sure if you were asking for advice on those or not. But I wouldn’t hesitate getting a Lexan bottle. I wouldn’t recommend putting anything warm or hot in them, though.
Hope this helps. I feel like I didn’t answer your question!
Actually, since responding here, we decided to switch over from the Lexan water bottles to stainless steel water bottles from greenfeet.com.
shame i have to download the article to read it, be better off putting it on the block.
if people read your block from a public computer it may not have pdf reader installed and they wont be able to install it.
Thank you for pointing that out to me. I will be happy to email it to you. I’ll copy and paste it right into the email box. -Wardee
Hi Wardee, Yes you answered my question. I really needed to hear that it didn’t break when dropped. We are so hard on our equipment. LOL I also wanted to know about covers, but you don’t use them. The kids like to have ice in their water and want it cool by the time lunch arrives. Thanks again for the help. 🙂
Thank you for the tips Wardee.