
When my daughter’s birthday rolled around early this fall, she wanted to have a no-bake cheesecake. We’ve made no-bake cheesecakes before, but always in the spring and summer when fresh fruit abounds. We’ve topped them with strawberries or blueberries, or like my grandmother — who used to go all out with this elaborate design that included berries — kiwis and peach halves. Those were gorgeous cheesecakes!
As I was looking at various recipes one morning, it hit me — it’s fall, so skip the fruit altogether and instead add pumpkin! My daughter loved this idea, and so I worked with a favorite recipe of ours and came up with this deliciously creamy Pumpkin Cheesecake Mousse Pie.
So Much More Than Pie
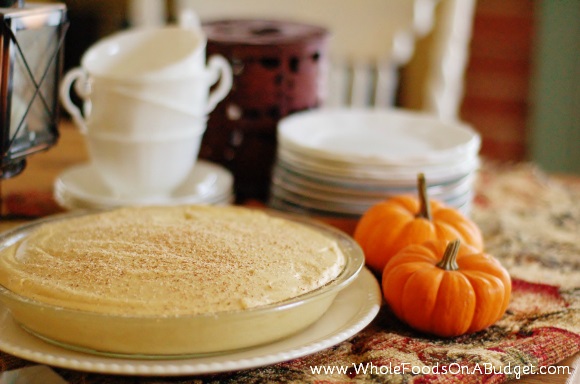
One thing I love about this pie is the versatility of the filling! Don’t just think “pie” here. You now have a very useful recipe that is so much more than just a pie. The texture of this pie filling falls somewhere in between a fresh, unbaked cheesecake and a mousse.
We have used the pie filling to top our sourdough pancakes at breakfast. We’ve also used it as a less-sugary “frosting” for birthday cupcakes — which, when mounded high, look amazing! We’ve eaten the filling alone as a mousse, and we’ve also frozen frozen it for a delicious pumpkin ice cream.
The one thing I haven’t yet tried is using this pumpkin filling in parfaits. But layered with whipped cream and homemade granola, it would make some amazing holiday parfaits!
Sweetener Options
As far as sweeteners go, my recipe calls for sucanat or rapadura. Maple syrup is an alternative that would be amazing in this pie, and I’d recommend using 1/2 to 3/4 cup. If you are concerned about the amount of sweetener, it’s super easy to cut it back. Just add your sweetener of choice to the filling, a little at a time, until you reach your desired level of sweetness.
If you need to eliminate all sugars, even the unrefined ones, stevia should work well in this recipe (though I have yet to try it). The sweetener does not affect the structure or texture of the pie, like sugars do in cookies, since it is never baked. The sweetener just simply has the job of sweetening. (By the way, if you give stevia a try, let me know!)
Crust Options
Here I offer two crusts. One is a traditional graham cracker crust, made from Gnowfglins’ own graham crackers. The other is a nut crust, good for anyone but especially those of you who are gluten-free or grain-free. Personally, I think the nut crust actually knocks the recipe up a notch: in my mind, Pumpkin + Nuts = Fall Yumminess!
If you choose the nut crust (which is less sturdy than the graham cracker crust), I suggest firming the pie to aid in slicing. You can do this in two ways. You can either cut back on the amount of whipping cream that is added, using only 1 cup (instead of the 2 cups called for — keep in mind your pie will be a bit smaller), or you can freeze the pie for about 2 hours prior to serving. The pie won’t be frozen, but it will be extra chilled and thus more firm. Slicing and serving will go more smoothly.
Pie For A Crowd?
Need more than just one pie? This pie can easily be made for a crowd. Multiply the recipe by 1-1/2 and use a 9″ x 13″ glass baking dish. Divide the pie into 18 even rectangles (3 rows by 6), which yields slices just over 2″ by 3″.
You can also double the recipe and use an 11″ x 15″ glass baking dish. Divide the pie into 25 even rectangles (5 rows by 5), which again yields squares just over 2″ by 3″. When determining how much to make, just keep in mind, people may be coming back for seconds — it’s that good!
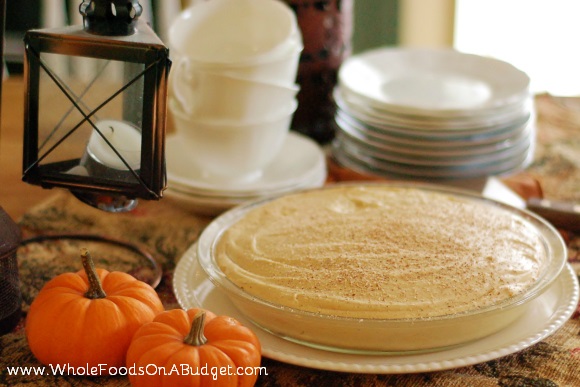
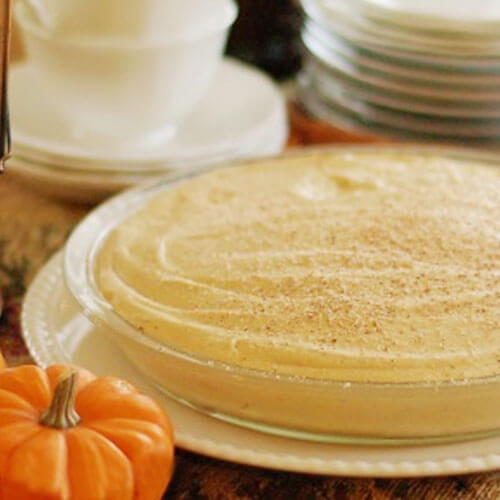
Pumpkin Cheesecake Mousse Pie
One thing I love about this pie is the versatility of the filling! Don't just think “pie” here. You now have a very useful recipe that is so much more than just a pie. The texture of this pie filling falls somewhere in between a fresh, unbaked cheesecake and a mousse.
Yields 10 servings. (The standard number of servings of a pie is 8, but this cheesecake is fairly deep and rich, and so we get about 10ish servings out of the pie.)
Ingredients
Graham Cracker Crust*
- 1-1/2 cups graham cracker crumbs
- 7 tablespoons grass-fed butter
Pumpkin Cheesecake Filling:
- 2 cups heavy whipping cream
- 16 ounces cream cheese
- 1 cup sucanat or rapadura** or maple syrup***
- 1 cup pumpkin puree when using homemade, make sure it is well drained and firm
- 1 teaspoon vanilla extract or the seeds from 1/2 a bean
- 1-1/2 teaspoons ground cinnamon
- 1/8 teaspoon cloves
- 1/8 teaspoon ground nutmeg
- whole nutmeg for garnish
Instructions
Graham Cracker Crust:
-
To make graham cracker crumbs, use a vitamix or blender to crumble crackers, or place crackers in a ziptop bag and roll with a rolling pin to crush. (A heavy, marble rolling pin works best -- I love mine!)
-
Preheat oven to 375 degrees Fahrenheit.
-
Melt butter and stir into cracker crumbs.
-
Press onto the bottom of a pie plate.
-
If desired, press up onto the edges as well. Bake for 10 minutes.
-
Let cool completely before adding the filling. (It's best to make the crust 1 to 2 hours prior to making the filling to ensure the crust is completely cooled.
Pumpkin Cheesecake Filling:
-
Pour the whipping cream into the bowl of a stand mixer.
-
Using the whisk, whip until soft peaks form.
-
Transfer the whipped cream to a large mixing bowl.
-
Add the remaining ingredients (except for the whole nutmeto the bowl of the standmixer.
-
Using the batter hook, mix the ingredients on medium speed for 3 to 4 minutes until smooth and creamy.
-
Scrape down the sides of the mixer and mix for 1 to 2 minutes more.
-
Add 1/3 of the whipped cream to the pumpkin mixture.
-
Gently fold the whipped cream into the pumpkin mixture to lighten it.
-
Then add all the lightened pumpkin mixture to the remaining whipped cream in the mixing bowl.
-
Gently fold until thoroughly combined.
-
Spread the filling into the cooled/chilled pie crust.
-
Chill in the refrigerator for at least 2 hours prior to serving.
-
This pie can also be made ahead one day in advance.
-
Prior to serving, grate fresh nutmeg over top the pie.
Recipe Notes
*Nut Crust Variation
I like to make the nut crust from this tart, and I'd recommend using walnuts, pecans, or hazelnuts, or a mixture of the three.
Prepare the crust according to directions and keep chilled until you're ready to add the filling.
This year, our Thanksgiving feast may very well see this pie added to the spread — made with maple syrup and a nut crust — but I’m thinking it just might appear in the form of miniature parfaits.
What do you think — would your family go for parfaits at Thanksgiving? Or do you just stick to pies?
...without giving up the foods you love or spending all day in the kitchen!
2 free books:
Eat God's Way
Ditch the Standard American Diet, get healthier & happier, and save money on groceries...
We only recommend products and services we wholeheartedly endorse. This post may contain special links through which we earn a small commission if you make a purchase (though your price is the same).

You had me at cheesecake. I adore cheesecake! Can’t wait to try this for Thanksgiving, thank you!
Haha! I love cheesecake too. 🙂
This recipe looks scrumptious–I am going to have to try it. It’s a nice change from the typical pumpkin pie. Before I got to your parfait suggestion, I was thinking it would make a delicious pudding. But parfaits, maybe with granola and chopped nuts? Yum! Sharing this post!
this looks really good. I would love to make it with maple syrup; however, I usually avoid recipes that advise you to simply sub maple syrup (or other liquid sweetener) for granulated sugar without adjusting anything else in the recipe. How could this possibly set up with that much added liquid?
Lisa, you bring up a good point. When substituting maple syrup for sucanat, you generally substitute with about 2/3 of the amount of maple syrup. So that would be 2/3 cup of maple syrup in this recipe instead of the 1 cup of sucanat. Generally you do want to cut back on the amount of liquid in a recipe when you do so. I would recommend, if making the pie, that you either cut back on the whipping cream (maybe only 1 1/2 cups instead of the two called for) or add an extra 4 oz cream cheese. If you are making the filling to use as a mousse, in a parfait, on top of pancakes, etc. I do not think the switch to maple syrup will be a problem, as none of those need to be firm enough to stand alone as a pie does.
Can this be done in a traditional cheesecake pan or will it fall apart?
Leslie, I wouldn’t recommend making this pie in a traditional springform cheesecake pan, as those are typically used for baked cheesecakes. This cheesecake is not baked, and it is also a bit like a mousse pie. If you did want to try using a springform cheesecake pan, I would not recommend the nut crust, and I would definitely freeze the pie for a couple hours to help firm it up before serving. Maybe let it sit at room temp for about 20 minutes before serving. You don’t want it to be frozen, just chilled and a bit more firm.
I made this last Christmas to take to a gathering, and it was a huge hit. I did make a rookie mistake, and made it with cream cheese that had not completely come to room temperature to soften, so there were flecks of white cream cheese throughout, but nobody seemed to notice or care. I will be making it again tomorrow for Thanksgiving. Thanks for such a great recipe!
once again Wardee..I love you. You know my love of all things cream cheese. LOL