
In the Sourdough eCourse, my friend Christina taught us a sourdough variation of the Artisan Bread in 5 Minutes a Day. She calls it the “bucket method.” She really does make it in a bucket, and it is super easy. Not to mention versatile; she shows us how to make loaves and logs, and also english muffins, pita bread, and cinnamon rolls. eCourse members have been trying other things with the dough, too. Tara, from the Keep It Real blog, used the “bucket dough” to make these beautiful empanadas. She’s even got an informative little video to show how she rolls them up. I can totally relate to her reverse cooking/planning method, as that is how I work, too. Enjoy! –Wardee

Sometimes the best meals are created through a lack of planning, limited ingredients, and not much time. Doesn’t exactly sound right, does it? For the most part we equate delicious, nutritious, and easy meals with a lot of careful planning and specific shopping. I tend to work backward. I collect high quality, nutrient dense, and interesting ingredients and then figure out a way to make them into a meal everyone will enjoy. Not an easy task for a family of five with many different tastes. Though I do enjoy the challenge.
On this night all the elements aligned just right and out came this amazing meal that everyone loved! Around 2pm, I realized that I didn’t have a dinner planned. Usually I can find something in the fridge that can easily be turned into a meal, but we were pretty cleaned out of leftovers. So I took a look at what we did have. Some frozen grass fed ground beef, onions, peppers, tomatoes, spices, cheese, and a no-knead bucket of sourdough in the fridge.
I thought of the Nourishing Traditions recipe for empanadas. I made these once, and while they came out okay, I wasn’t particularly impressed with the structure of the dough. It left a pocket of meat in the middle and a lot of hard crust around the outside edge that was just peeled off and discarded. I thought I might be able to improve the form of this meat pocket a bit to suit our tastes. I took the frozen meat out to defrost and removed the bucket of dough from the fridge. About fours hours later I was ready to get on with it. From the previous experience I also realized that the meat filling should be cooled a bit before trying to stuff it in soft fragile dough. I got to work on the meat filling.
Now, the beauty of these baked ‘burritos’ is that the filling ideas are endless. This time, I went with a Mexican flavor. First, I browned an onion and green bell pepper in a cast iron skillet with some lard. Once that was browned, I added the grass fed ground beef. Cooked until done and then started seasoning. I threw in some fresh lime juice, chopped fresh tomatoes, garlic, cumin, red pepper, salt and pepper, and kept tasting it and adjusting till the flavor was just right.
Sorry — it’s not specific. That’s how I cook when I’m not following a recipe. Once the meat was flavored to my liking, I started preparing the dough. At this point, the bucket of dough had sat out for at least several hours. It was softer, not as chilled, and had expanded a bit. I took out a big handful of dough and put it on a well floured counter. This time I used unbleached white wheat flour. The better option would have been some whole wheat sprouted flour, but again, I was working with what I had on hand.
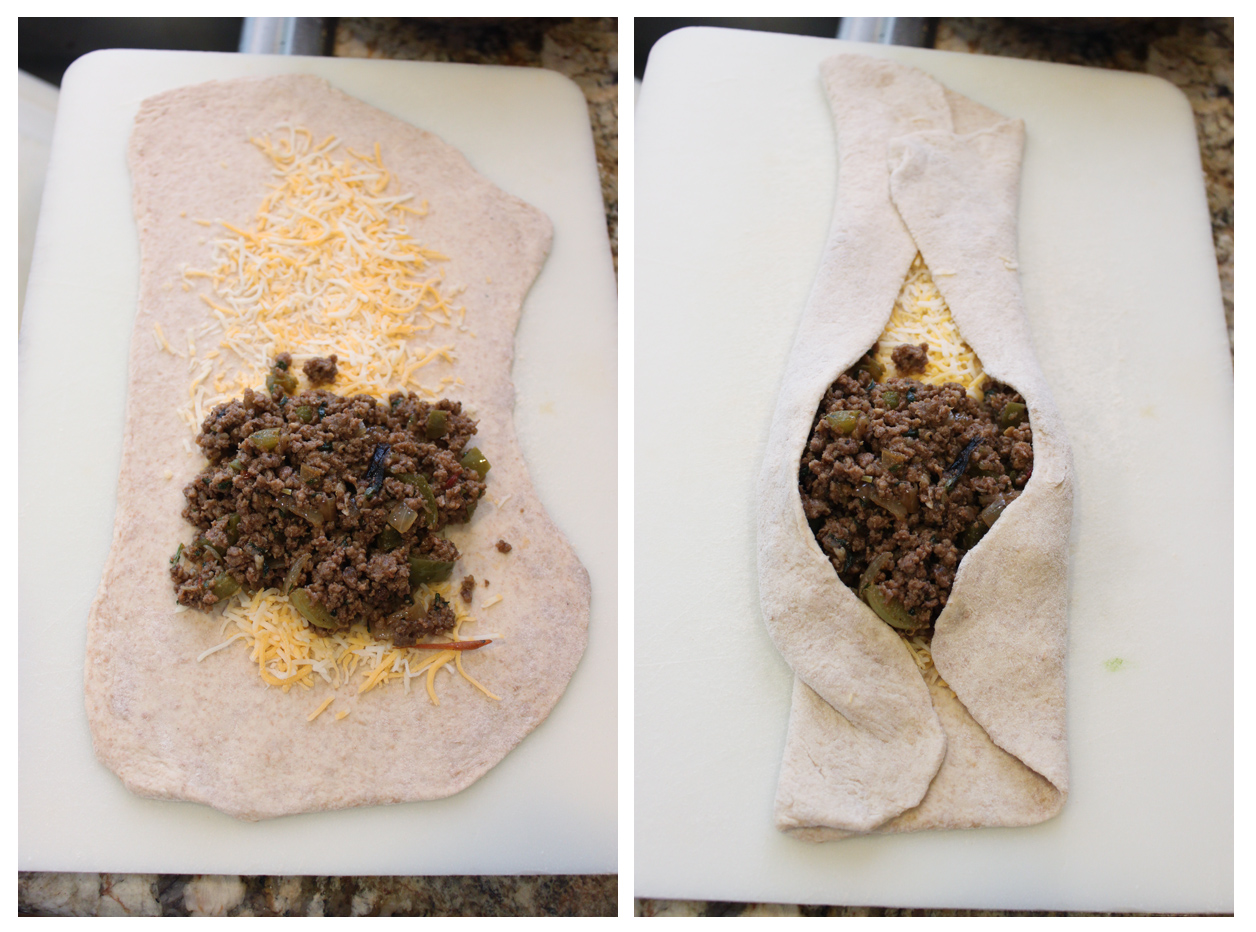
Here’s the folding technique: Pat out the dough (probably about a small to medium loaf amount) to a rough rectangle. Then cut it in fours. Use a rolling pin to roll out a piece to another rough rectangle. Pick up the dough and stretch it out more if needed. Then transfer it to a clean surface (brushing off excess flour). Sprinkle cheese down the center. Put about a third cup of meat filling at the bottom portion of the rectangle. Fold the long sides up. Start at the bottom and carefully start rolling the burrito up while slightly pulling it length wise. Be sure the stretch the end part of the dough wide enough to stretch mostly across the length of the burrito so that you don’t have a thick amount of dough in one spot. Pinch the seam together and place seam side down on a baking tray.

The amount of dough I had in my bucket made enough burritos to fill two of these trays. I baked these for 20 minutes in a preheated oven at 450 degrees. Since the filling was already cooked, I wanted a high temp oven to quickly cook the dough and give a nice crisp outside. After 20 minutes, I took them out and brushed the tops with coconut oil. I put the tray back in the oven for 5 minutes. I let them cool for about 10 minutes before serving.

These turned out incredibly delicious! I served them cut in half with sides of kefir cream, lacto fermented bean dip, avocado, and marinated tomatoes. Reheating the leftovers was very easy. Cut in half and stick in the toaster oven on ‘bake’ for about 5 minutes. Tastes the same as fresh out of the oven.
This week I am planning on making another batch with an Italian theme. Mozzarella cheese, local sausage, and homemade pizza sauce. Yum!
Back to Wardee: Interested in the bucket dough? The Sourdough eCourse never closes — you can enroll any time. Come on by and learn the “bucket method” from Christina, too! 😀
...without giving up the foods you love or spending all day in the kitchen!

2 free books:
Eat God's Way
Ditch the Standard American Diet, get healthier & happier, and save money on groceries...
We only recommend products and services we wholeheartedly endorse. This post may contain special links through which we earn a small commission if you make a purchase (though your price is the same).

Tara, you are awesome!!! I had the idea to make these, but I haven’t made my dough yet (waiting for my azurestandard order to come it). Thanks for sharing this with us!
YUM. Tara, these look great. I love the way you rolled them.
Local eateries here in Buffalo serve a thing called an eppie roll–one of my favorites. I kinda thought this dough would work for making them but wasn’t sure. But after seeing what you did (great little video too, it really helps seeing things sometimes) I can’t wait to give them a try and make some of my own “rolls”.
Thanks Tara!
Tara~ Thanks for a great video, can’t wait to try it 🙂
~Christina
This looks *amazing.* I love empanadas; great idea making it with sourdough. Thanks for sharing the recipe!
This looks *amazing.* I love empanadas; great idea making it with sourdough. Thanks for sharing the recipe!
This is great! I love the video and am thrilled to find someone who cooks like me, ass backwards! I am making some version of these this week for sure
Tara, I tried these last night and they were great! I already had some “no-knead bucket bread” in the frig and a pound of already-browned ground beef in the freezer. I added a little onion and some canned salsa to the beef when I warmed it up.
Thanks for sharing this with us!
Elizabeth, that’s awesome! Did the folding technique work ok for you? So excited that someone used my idea! 😉
Thanks for all the kind words! The video was a bit of an after thought. But I realized that a visual to how I was folding them up would be good, so I grabbed my daughter and had her do a quick film for me.
This looks great! Thank you! I am going to try this very soon as I have all of these ingredients on hand including my bucket of dough that has been out on the counter for a few hours!
Last night I made these again with an italian twist. I made some fresh Italian tomato sauce, mixed it with local italian pork sausage and used mozzarella cheese. Oh yum! Delish!
Oh Wow these sound good. We are going to give this one a try later in the week. One question though, could you tell me how you make your fermented bean dip?
Oh goodness, I think my husband will love these! When I was strictly concerned only for our budget, I learned how to make empanadas with refrigerated biscuit dough. I feel guilty still serving them. This will be a great alternative since empanadas are probably one of my husband’s favorite items. He requests them often!
Yum! I’m super excited – I was looking for someone who had used the bucket dough for empanadas, and this is perfect! I will be making these next week, served with some sour cream. Thank you!!
Okay, I just made these and they are GOOD!! More like a chimichanga that’s baked instead of fried, but whatever you call them, they were tasty! I think I’ll try to roll out my dough even thinner next time – it was tough to get all of the dough cooked all the way. But even though some of it was slightly doughy, they were delicious and filling. Thank you so much for the recipe!!