
This is how I shape Whole Wheat Bread loaves.
*In the following pictures, you will see only my left hand, because I lifted the right hand from its working position to take each photo. During loaf shaping, my right hand is usually adjacent to the left hand, doing the same kind of work.
I put each portion on a clean, greased countertop. With clean hands, I roll the dough back and forth between the counter and the palms of my hands, while using my fingers to tuck the long edges in. The following pictures show the progression of the dough from a fairly round ball to a smooth tube of a loaf.
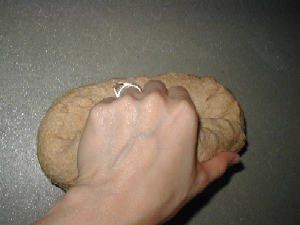
The dough is still in a ball. I create some edges as I dip my fingers into the center of the ball, pressing the air out and drawing the edges into the center of the ball of dough. I keep tucking in these edges as I roll the dough back and forth on the countertop into a tube shape. I use firm, but gentle, pressure.
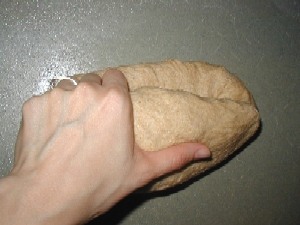
Still using firm but gentle pressure, I continue rolling the dough back and forth between my palms and the counter, all the while still using my fingers to tuck in the edges.

It is lengthening into a tube shape and I am still rolling it back and forth and tucking in the edges.
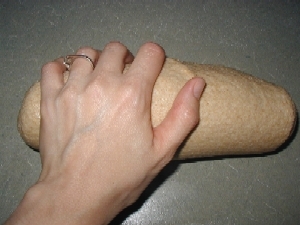
It is about as long as I want (about 7 inches). I press the tucked-in edges together and roll the loaf over so the tucked in edges are down on the countertop.

Using my hands, I alternate their position between the ends of the loaf and the the center of the roll to gently press the dough smooth.
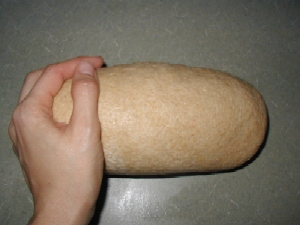
I am done when the loaf is beautiful and smooth.
Then I proceed with the Whole Wheat Bread Recipe directions — transferring the loaf to a greased bread loaf pan, making cuts diagonally along the top and baking the bread in the oven.
We only recommend products and services we wholeheartedly endorse. This post may contain special links through which we earn a small commission if you make a purchase (though your price is the same).

Thank you Wardee!
From what I can tell, you are actually rolling the dough while pushing in with your fingers?
This is an excellent pictorial, thank you so much..you would think I could get it now..lol..I know!…..you come HERE and teach me ok??? I would hug your neck and give you tea…how I wish! warm hugs to you today as alway’s
Yes, I am rolling while tucking the edges into the center. But rolling back and forth, not all the way around the dough. It is kind of like, roll forward as I tuck, roll back-tuck more, roll forward-grab-and tuck some more, until it is a good tube length. Then shape it into a smooth loaf.
I wish I could visit you and get that hug and some tea 🙂
Dear Wardee,
I think this is where I went wrong with my bread, I made two loaves of bread and some rolls. The rolls rose, but the bread didn’t the last rising. I had great rises the first and second time…. But when I shaped the loaves I didn’t do much to the loaves at all and I think they needed a bit more working. but the bread was flat…. I also read somewhere that the bread gets some push if you put it in an already hot to bake oven. I started the bread to bake and never took it out of the oven. In doing the rolls I rolled them and tucked them a bit more than I did my bread… Any clues?
Love Judy
Judy,
You say you had great rises the first and second times — are you counting the sponge as the first rise? I don’t normally consider that as one of the rises because the dough isn’t complete yet. But it seems from the context of your comment that you are counting it as a rise. So I am going to assume that and base my comments on that assumption.
I think you’re right that your loaves needed to be worked more. Give that a try. I hope it works. It is a reasonable explanation since you had fluffy rolls and flat loaves.
I myself have been playing around with having a hot oven for bread baking lately. I let the loaves or rolls rise in the warm (but off) oven. Then when they are ready or just about ready to bake, I pull them out and set them near (but not on) the burner where the oven vents. Then I turn on the oven and heat it up. The venting heat keeps the loaves warm while the oven preheats. Then I bake them. It seems to make a difference for the rolls, so I prefer baking them this way.
I appreciate hearing your experiences. I have not perfected baking bread. I still learn something every time! Please let me know how your bread baking turns out next time. 🙂
I made your bread yesterday and my family all agreed it was their favorite recipe so far. I added the poppy seeds and the oats and alittle over 1 T of the flax seed meal. My question is how much flax seed do you add to your 2 loaf recipe? Also do you ever double the recipe, and how has that turned out? Thanks for great site!
Olivia in OH
Olivia, I am so happy that you enjoyed this recipe! You added a good amount of flax seed meal. I normally put about 1/4 cup flax seeds into the whole recipe, which turns out to be 2 T per loaf.
I don’t double the recipe because my mixer couldn’t knead that much dough. What I do instead is make two batches at the same time. You could double it if you’re planning to do the kneading by hand, or if you have a Bosch mixer which can handle more dough.
This is what I do: I let one batch sponge in the mixer bowl and the other sponge in a second bowl (big glass or stainless steel). When the first batch is ready to knead, I make it up according to the recipe, then transfer it to a third bowl (greased) to rise. I move the sponging dough from the second bowl to the mixer bowl and make up that batch. I let that second batch rise with the first batch of dough. The second batch is about 5 to 10 minutes behind the first batch, but by the time I’m ready to shape the loaves, it catches up or is very soon ready also. Then I proceed with both of them at the same time to the conclusion of the recipe.
Hope this helps! Thanks for visiting my blog.
Such a lovely tutorial, dear Wardee. 🙂
We enjoyed watching W & D so much more the second time, this past weekend. I do believe I like it as much as P & P. It’s just so sweet and has a lovely story line.
We will be receiving The Waltons season 2 and the children’s sewing machine book on Friday. Yea!
I am going to see if I can play with my blog now and redecorate. Have a wonderful Wednesday. Love, Robin
Hi Wardee,
Yes I was using the sponge cycle as the first rise. Sorry I will get my terms right. Thank you for your help. Even though it didn’t rise well I’m still toasting it and eating as toast.
The rolls are wonderful almost gone.
Thank you,
Judy
Wardee, Your pictorial is so helpful, thank you so much for sharing your knowledge and God bless you for it!
Love
Sylvia
Thanks for the tutorial. I love your recipe. I added a little molasses for flavor in place of some of the honey, yum!
Thank you Wardee,
I will try your method. What I use is a flatten and roll method. I have found that it works fine with whole wheat and/or all-purpose flour. But I have had problems when I make bread from spelt flour. The problem I have is that the spelt loaves come out with a gap beneath the upper crust and the loaf. I am thinking the more fragile gluten in the spelt flour means that the loaf is less forgiving if the dough is not folded just right. This may be the answer. What I normally do is just flatten the dough, mist it with water a bit, then tightly roll it into shape.
Thanks again.
Dan – that’s great to know! When I do spelt loaves, the dough is so globby that I just do my best at shaping it. If there are gaps, I assume that is because I didn’t get out enough built up gas prior to the shaping. How is your dough consistency with ww v. spelt? Let me know how this goes for you. I am very interested.
These loaves are shaped beautifully! I’m just finishing a batch of sourdough when I found your site. Next time I’m following your technique.