

Isn’t there something magical about pudding cups?
You open the lid to find a perfect, personal-size container of sweet and creamy deliciousness.
Even as an adult, I have a weakness for pudding cups! And my kids love them too… especially when I tuck one into their school lunches.
Since I’m a momma who knows the importance of packing a lot of nutrition into small servings, these mini Instant Pot lemon pudding cups allow me to do just that. Plus, they only take about 10 minutes to whip up (plus a bit of cooling time).
In 1 serving, my kids are getting healthy fats, lauric acid, pastured eggs, digestion-friendly lemon, and a teensy bit of natural sweetener. But to them? It’s just a special dessert.
Instant Pot Lemon Pudding Cups
It never occurred to me to employ my Instant Pot for pudding since I usually make these raw No-Jello Chocolate Pudding Cups (which aren’t actually pudding at all but a sneaky way to get picky eaters to devour avocado!). Sometimes we tire of the same chocolate pudding over and over, so once again, it’s the Instant Pot to the rescue!
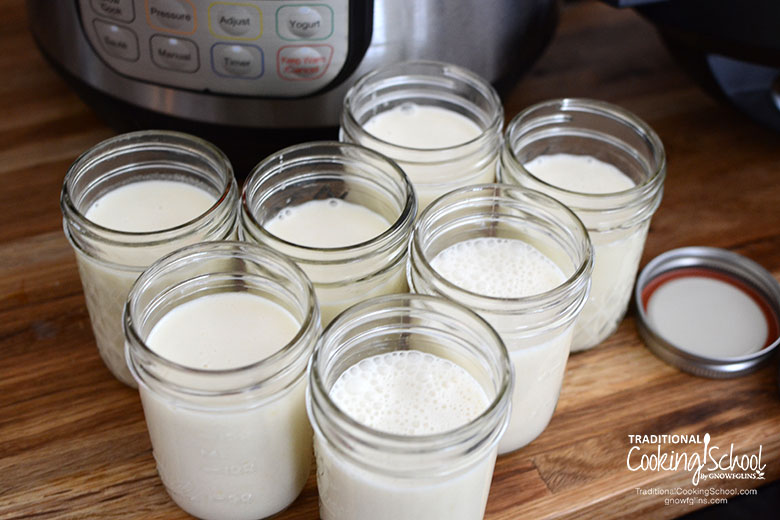
These Instant Pot lemon pudding cups cook right in their serving jars — no need to transfer or dirty more dishes. Once they’re set, simply put them into a lunchbox, pack them in a picnic basket, or toss one into your purse for a quick snack on the go!
Toppings like fresh or frozen berries, toasted coconut, whipped cream, whipped coconut cream, crispy nuts, or even chia seeds are optional, but highly encouraged. 😉
And Now… For The Recipe!

Instant Pot Lemon Pudding Cups {for school lunches, picnics, & more!}
In just 1 serving of these Instant Pot Lemon Pudding Cups, my kids get healthy fats, lauric acid, pastured eggs, digestion-friendly lemon, and a teensy bit of natural sweetener!
Ingredients
- 3 cups raw whole milk or dairy-free milk of choice room temperature (I used full fat coconut milk)
- 1/4 cup lemon juice
- 1 1/2 tablespoons lemon zest
- 1/2 cup maple syrup or honey
- 3 tablespoons coconut oil room temperature
- 3 organic or pastured eggs room temperature
- 2 to 4 drops lemon essential oil optional
- 2 tablespoons sustainably-sourced gelatin (certified glyphosate-free)
Instructions
-
Add milk, lemon juice, lemon zest, sweetener, coconut oil, and eggs to a blender.
-
Blend on medium speed for 1 minute.
-
Taste.
-
Add lemon essential oil for more lemon flavor or a touch more sweetener if desired.
-
Blend again.
-
While the blender is running, remove the venting lid and add the gelatin, 1 tablespoon at a time.
-
Continue blending until smooth.
-
Pour the pudding mixture into 7 (1/2 pint) glass jars.
-
Secure a lid on each jar.
-
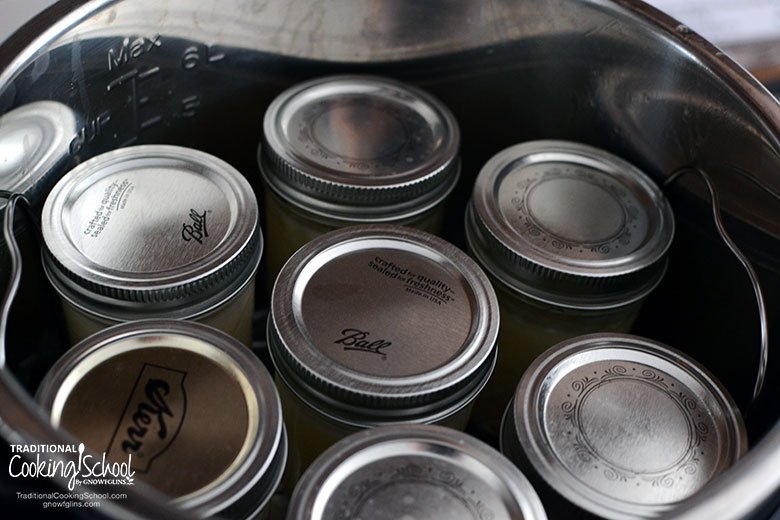
Add trivet and 1 cup water to insert pot of pressure cooker.
-
Place all 7 jars onto the trivet. In my 8-quart Instant Pot, they fit perfectly in a single layer.
-
Secure lid of cooker and close the valve.
-
If using an electric cooker, cook on high pressure for 5 minutes. With a stovetop cooker, bring to high pressure and maintain for cook time of 5 minutes.
-
Manually release pressure.
-
Carefully remove the jars with a pair of tongs or your hands and a hot pad.
-
Set them aside to cool.
-
Once you can comfortably touch the jars, transfer them to the fridge to set.
-
You may notice separation. Simply give the jars a shake or two while they're cooling in the fridge to redistribute the ingredients.
-
Enjoy!
Recipe Notes
- Jar = 1 serving. Top with garnishes like berries, toasted coconut, or whipped coconut cream.
Recipe Notes
I used my 8-quart Instant Pot in this recipe, and the 7 (narrow 1/2 pint) glass jars fit perfectly in a single layer on the trivet. If you have a smaller pressure cooker, cook the jars in batches.
Cooking these with the lids secured serves 2 purposes. First, if you need to stack the jars for any reason, you can stack them on top of one another. Second, the lids keep water out of the pudding cups.
Pressure cooking the pudding cups with their lids on will cause them to seal, like canning. Do not store these on a shelf, however. They are not safely canned!
Because the lids seal, you may want to loosen them before packing into a small child’s lunch.
If you notice separation during cooling, that’s okay. Simply give the jars a shake or two while they’re cooling in the fridge.
Have you made pudding in your Instant Pot yet? Will you try these the next time you’re packing lunches or planning a picnic?
This post was featured in 22 Real Food Instant Pot Desserts, 60 Easy and Nourishing Picnic Recipes and 31 Lunchbox Recipes & Tips For Packing A Nourishing Lunch.
...without giving up the foods you love or spending all day in the kitchen!

2 free books:
Eat God's Way
Ditch the Standard American Diet, get healthier & happier, and save money on groceries...
We only recommend products and services we wholeheartedly endorse. This post may contain special links through which we earn a small commission if you make a purchase (though your price is the same).

What if you only have a 5 qt. Instant Pot?
Penny, I’m not sure you’ll be able to fit all the jars in at once. But you could easily do it in 2 batches… the cooking time is so short.
I made this today and so delicious! Thank you for sharing this! Have you switched out the lemon for different flavors?
Yay! I’m so happy you enjoyed them! I haven’t tried other flavors, but I would love it if you would let us know if you do!
This pudding was amazing! My husband & teenage boys loved it too. We had it with toasted coconut (I found organic unsweetend coconut at Trader Joe’s for $1.99) with a dash of salt mixed into the coconut. Next we will try the chia seeds with coconut.
This looks great! What kind of trivet did you use? I have ones with felt on the bottom or made of cork. Could a ceramic plate work? Is the purpose to keep the bottom from burning?
Thanks!
Hi Kim, I used the trivet that came with my Instant Pot. I think a plate would block the water too much and prevent it from pressurizing completely. The purpose of the trivet is to give the jars a surface to rest on with water underneath — without submersing the jars in the water. At least a cup of water is required for the Instant Pot to come to pressure, so you can’t make this recipe without it. Hope that helps!
Thank you for your response Lindsey. I realized last night that the rack was the trivet! I hadn’t thought about that. I made them and all 6 eaters in my family loved them! Thanks!
Hi Lindsey!
Hello my Minnesota neighbor! I don’t have enough jars right now but I want to make this for dessert tonight. Can I skip the jars and put it in my 4 cup pyrex bowl with the parchment/foil cover to keep the moisture off–or does it NEED to be cooked in the sealed jars.
Thanks so much! I have gotten the BEST ideas from GNOWFGLINS!
Amanda
Hello! You can totally make this in a larger bowl… just beware: it may take longer to cool and set. Let me know how it turns out for you! HUGS!
This sounds so yummy, but I cant use coconut oil due to allergy, what would be a good substitute?
So, can you use coconut milk, Ava? Or are you just allergic to coconut oil? You could substitute ghee for the coconut oil. Hope that works for you!
My husband is allergic to coconut so we cant use any coconut at all. I dont have ghee, can I use pastured butter? Thanks!
Do I need to use a longer cooking time if I cook the mixture in pint jars? I don’t have enough 1/2 pints that aren’t already being used! Thanks.
No, you can do the same cooking time, Heather!
Guys! This turned out using my big 4 cup pyrex bowl. Kids ate it up before I could snap a picture. Thanks, Lindsey!
Amanda
I have made this three times now, my daughter loves it so much. She is in kindergarten, so I make some of it up in 4 oz jars, too. My only problem is that I am breaking the jars during the cooking. First run went great, no breakage. Second run I broke one 8-oz jar. Third run I broke one 8-oz jar AND a 4-oz jar. I’m trying to be aware of headspace. Do I need to try leaving even more? Is something else going wrong? I love this recipe, but don’t want to break a jar every time. Thanks.
Judy, I’m so sorry to hear about your jars breaking! How sad! I spoke with Wardee about this, and neither of us have experienced what you describe. We’ve never had a jar break in our IPs! So, what we’d recommend is that you check your jars and make sure they’re heat-proof and suitable for use for canning/pressure canning. Second, if they are heat-proof and breaking, we recommend that you contact the manufacturer to report the issue. Hope that helps!
Are all Ball jars suitable for canning? I’d love to try this today!
I’ve had jars break (with a different recipe) if the water level is too high and ends up touching the bottom of the jars, so make sure to use exactly 1 cup of water and that the jars are above the water line when sitting on the trivet.
Hi! I really want to try this recipe but I don’t have a pressure cooker:( What can I do instead? Thanks!
Hi, Paola! I put the pudding recipe into 6 half-pint jelly jars, put canning lids on, then put water and a hand towel in the bottom of my oval-shaped crock pot, then I put all 6 jars into the crock pot, put the lid on the pot, and turned it on high. It was supposed to cook for 2 hours. Unfortunately, I went into my office and forgot about it. By the time I remembered, the pudding had cooked for several hours, and was pretty much ruined, but it was too expensive to throw away, so I refrigerated them. The next day I sampled one. Oh, dear! It was okay, but not a favorite, so I added about a half tablespoon of raw cacao powder and about the same amount of raw honey to the jar, stirred, and WOW, it was great!!! What a yummy desert, even WAY over cooked! Can’t wait to try it again with a good batch. Will set a timer next time! 😉
A little late but I have successfully made this recipe using the same principles as with a traditional custard. First whisk the eggs in a bowl, warm everything else (minus the gelatin) on the stove on med-low to where it is just steaming, then with an immersion blender on low in the egg bowl, trickle in the milk mixture until incorporated. Wipe out the pot, put it back on the stove in low heat, and pour the egg & milk mixture back in, stirring constantly or using the immersion blender on low. Sprinkle in the gelatin a bit at a time. Keep stirring/blending until the mix is thick enough to coat the back of a spoon and a finger swipe across the spoon stays put. Pour into serving jars and stir every once in a while until it cools enough for the fridge. Don’t be in a hurry and dump the warm milk into the eggs or turn up the heat, or you’ll risk scrambled eggs!
Has anyone tried this with an egg substitute? Sadly we just found out my oldest is allergic to eggs. Thanks!
You could try leaving out the eggs and using an extra teaspoon of gelatin.
Try adding an extra tablespoon of coconut oil and an extra teaspoon of gelatin. They might set up really firmly, but I think that will work.
Great idea! Thanks!
??Hi Lindsey
I’d like to use agar agar instead of gelatin. How much should I use according to you ? Thanks !?
Sorry, flo, I’ve never used agar agar, so I can’t say.
I saw Wardee mention a sugar free version of this recipe. Any chance you can share how that would work?
I used two 3Cup jars with lids but after one minute in the IP, both the jars broke. :/ Not really liking this recipe right now.
I am going to make it again when I have more lemon juice, and leave it in a 4 Cup pyrex measuring container or stainless steel bowl. My first attempt did smell awesome as I cleaned out the IP!
Hi Dottie, are you using Ball or Mason jars? It’s important to use glass that’s approved for high heat and pressure. Sorry to hear about your jars breaking, but I promise this is a lovely recipe!
Just made this recipe – jars are cooling and the contents have separated and are liquid? Is this normal? I will put in refrigerator shortly, but it doesn’t look good…
I made it yesterday and had the same problem – separation. The taste is yummy, but the texture is odd. I used coconut/almond milk. May try again with regular milk.
This happens to me every time, too. I shake them up a couple of times as they are cooling and they are just fine.
Thanks for the tip, Judy! 🙂
Another thing to consider: is the milk or milk substitute room temperature? The recipe calls for it to be. That one detail might make a difference in the separation of the mixture. I used cold almond milk straight out of the fridge. Oops! Didn’t notice that part of the recipe! Will correct it next time.
I just bought a micro-grater for zesting. Can’t wait to try it on the next batch! 😀
I thought I saw that this could be made in a crockpot. Don’t see instructions now.
Phyllis, pour the pudding mixture into 5 or 6 1/2 pint jelly jars, put the lids on tight, and put water into your crock pot along with a hand towel. Make sure your towel is soaked, and there is water to spare. Then put as many jars (an oval-shaped crock pot will take them all) into the pot, put your crock pot lid on, and cook on high for 2 hours. Don’t forget about them, like I did, or they will curdle! Since the liquid separates from the more solid components, it is a good idea to shake them a couple of times throughout the cooking process. Be careful not to burn yourself! Use a hot pad or dry towel. Hope this helps! (I also added 1/2 to 1 Tbsp. of raw cacao powder and about 1/2 Tbsp. of raw honey to each jar after they cooled, and stirred them. Yum! It adds a chocolaty taste!
Addendum: Actually, shake the pudding jars a couple of times as they are cooling down, not while they are cooking. Sorry for the confusion!
Thanks! I’ll try that.
Cant waiting o try this recipe!! Would you happen to know the substitution amounts for honey vs THM stevia? Love honey but, trying to stay THM. Thanks!
Michelle, I added about a teaspoon (or less) of raw honey to each half pint jar, after they had cooled down, in order to preserve the benefits and nutrition of the honey. I didn’t measure, as I was using a regular eating teaspoon. You could do one jar with a few (4 or 5) drops of liquid stevia, stir, and take a nibble. If it isn’t sweet enough, especially if you add unsweetened cocoa powder or raw cacao powder, then try 4 or 5 more drops or until you get the mix that works for you. Everyone’s sweet tooth is different. I haven’t had refined sugar in almost 5 years. Loving it!!! And don’t miss it. There are so many wonderful alternatives available, and my taste buds have modified from craving rich deserts to absolutely love fresh and dried fruit of all kinds, honey, pure maple syrup, etc. etc. When I’m hungry for chocolate I stir 2 heaping Tbsp. of cacao powder with 1 heaping Tbsp. of raw honey (I LOVE the honey from YS Eco Bee Farms). I add about 1/4 tsp. to 1/2 tsp. of almond milk or unsweetened pineapple juice – yummy! – to make it easy to blend, stir, and enjoy right out of the bowl, or as a fruit dip, or topping for frozen banana ice cream. Double yum!! You can also add a bit of sea salt and/or a bit of vanilla extract to the chocolate.
Michelle, I would add stevia to taste. So start with 1/32 of a teaspoon and stir it into the recipe before cooking. Then taste. Add more and continue tasting until it’s right for you. Hope that helps!
What is the reason for putting on lids? Would a piece of foil over each jar work the same?
Renee, I can’t say for certain, as I’m not the author of the recipe, but my guess is that lids keep out any water or steam that might ruin the recipe. It doesn’t can the desert to the place where it can be kept on a shelf, though the lids do seal, so it must be the water factor, coupled with the high pressure of the IP.
Thanks Sheridan 🙂
You’re welcome! Happy eating!
Yep, this is correct! The lids keep water/steam out of the pudding cups.
Thanks, Lindsey! And thank you for the special desert recipe!
What is sustainably sourced gelatin ? Is it Knox unflavored gelatin.
Hi. Love you Lemon Pudding Cup Instant Pot Recipe. Thank you. After the pudding is chilled, I took it a step further. I empty it into a blending container and add a generous splash of thick Kefir and additional lemon or sometimes lime juice. I use your DietzSweets Blend, so I add that now to taste, so that it doesn’t get cooked in the Instant Pot. Then I hit it all with a stick blender until combined and creamy. Then put back in the cups and in the refrigerator. It comes out more creamy smooth, and a tiny bit chiffon-like too. I get some real fresh citrus taste and some probiotics as well. Maybe you’d like to try this. It gels up a little to creamy the second time in the refrigerator too. Love your site and recipes.
This was delicious and turned out perfectly. I used this vegan dairy-free milk for a high-protein breakfast: https://eatbeautiful.net/vegan-bean-milk/