
I wrote on August 25, 2007 that I was going to try to grow microgreens.
I royally messed up that first set of microgreens — buckwheat, sunflower and flax. According to Jeff, I sterilized them. 😀 That’s because I was so concerned about keeping them warm enough that I kept them covered all the time and they got too hot. I only got one sprout.
(Here’s the point in this narrative where I need to admit that I don’t have a green thumb and in fact, don’t enjoy gardening much at all. I can’t stand getting my hands dirty and I’ve never found myself dreaming of garden plans. The only reason I am eager to garden is because I want the free — or at least cheap — and nutritious food!)
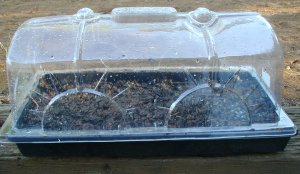
So I started over with the microgreens. I replanted buckwheat, sunflower and flax seeds. I kept the trays covered at night only, and uncovered them during the day. The soil in them is a mix of dirt and our own compost. (See a covered tray below.) As for how many seeds I planted, well, that is a work in progress, as you will see… In each tray, I covered the soil with a single layer of seeds, pretty much filling it all up (as the people at the Farmer’s Market told me).
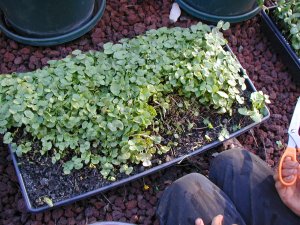
It was so cool to watch the sprouts emerge and then fill in. Obviously, I need to work on how many to plant! The sunflowers didn’t fill in too well, while the buckwheat and flax greens were terribly crowded.

Sunflower Microgreens
Buckwheat Microgreens

Flax Microgreens
I would say it took about 10 days for the microgreens to be ready to harvest, so we began to do that late last week.

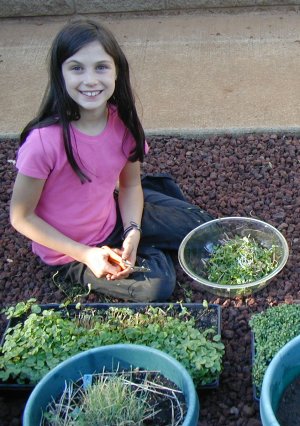
C. is harvesting the sunflower microgreens.
B. harvesting the buckwheat sunflower greens.
To harvest them, we cut the base of the stems, just above the dirt, with kitchen scissors. When the microgreens come inside, they are usually very dirty. And the degree of soiling depends on who the harvester is. 😉 So we dump them in a sink-full of cool water and let them soak for about 5 minutes with a bit of gentle agitation provided by eager fingers.
Much of the yuck will sink to the bottom, which makes the job easier. But we still have to go through the greens and pull out the hulls and other sticks or bits of dirt. Then we transfer the greens to a bowl, drain the water, and fill the basin again with cool water for another rinse. Usually, about 3 of these rinses should do the trick. By the 3rd time, the water is clean. If it wasn’t, I would rinse again until it was clean.
The last step is to transfer the greens to the salad spinner to spin them dry. Aren’t they beautiful?

A mix of all three types of microgreens we grew —
buckwheat, sunflower and flax.
The flax greens are really tiny, and proved to be hard to harvest and clean, so I don’t think I’ll grow those again as microgreens. I may sprout them indoors, though.
Yesterday, we planted 3 more trays of microgreens, one each for buckwheat, sunflower and mung beans — a new one to try. My plan is to always have greens available, so we will have to be filling trays every week or so.
On a related note, I have begun sprouting again. Sprouts are different than microgreens.* I took a break for a few months, during the hot weather. My inspiration to get some sprouts going again came when I found some organic red clover seeds recently. They are yummy! I found them to be more robust and quicker growing than alfalfa. All stacked up, here are my four Sproutmaster trays. They are holding a batch of red clover sprouts that I began this morning.

Here’s how I do the sprouts. In the evening, I begin soaking 1/4 cup of red clover (or alfalfa) seeds in water in a little glass jar — and I do one of these for each tray. So I end up with a total of four glass jars with two tablespoons of seeds in each. Then, the next morning, I empty the contents of each jar into a separate clean sprout tray and rinse the seeds thoroughly under cool running water, right in the tray. When the rinse is over, tipping the tray side to side, then tapping it lightly on the sink bottom ensures that the water drips out sufficiently. The sprouts shouldn’t be left too wet.
During the next week, I will rinse the sprouts every morning and every evening, and sometimes during the mid-day, if it has been a hot day and I think the sprouts could be drying out. In between rinses, I stack the trays on an old cookie sheet in a corner by the sink, just like the picture shows. On top of them I put the cover that came with the trays (not pictured).
The sprouts are done when they’re pretty tall and the first two leaves are fully out. At this point, I leave the sprouts uncovered so they can turn green. This takes a day or so. Then I take the sprouts out of the trays and rinse them thoroughly a few times by immersing them in water. I use my fingers to gently pull them apart, which releases trapped unsprouted seeds and seed hulls, allowing them to be washed away. Then I store the sprouts, in a covered bowl, in the refrigerator. They will keep a week or so in the refrigerator. I rinse them anew every few days to keep them fresh.
Sprouts and microgreens tossed together with olive oil, balsamic vinegar, salt, pepper, dill and garlic salt… yumm! That’s been the base of our salads for the last few days. We top that all with other veggie chunks and a little more oil, salt and pepper.
*How are microgreens different than sprouts? Sprouts are grown in water, while microgreens are grown in soil. We eat the entire sprout – roots, stems and leaves; of microgreens, we eat only the stem and leaves, leaving the root behind in the soil. Sprouts are grown with little light and high moisture; microgreens are grown in sunnier and drier conditions. Sprouts are eaten shortly after seeds/beans/grains are germinated; microgreens are eaten when the young plant is more mature. Finally, when we eat sprouts, the cotelydon leaves may or may not be exposed, while the microgreens will have matured cotelydons and at least a first pair of true leaves.
...without giving up the foods you love or spending all day in the kitchen!

2 free books:
Eat God's Way
Ditch the Standard American Diet, get healthier & happier, and save money on groceries...
We only recommend products and services we wholeheartedly endorse. This post may contain special links through which we earn a small commission if you make a purchase (though your price is the same).

Wow, both these items have been on my mind lately. I was thinking of doing a cold frame for microgreens up against the side of the house. Thanks for sharing your learning curve here!
A cold frame sounds wonderful. When we have a permanent garden, we plan on having cold frames for the greens. There is a book — “Four Season Harvest” by Eliot Coleman — that has building plans for making your own cold frames. I have checked that book out from the library so many times!
I did not know you could use buckwheeat, and flax for micros. Thanks!
Hi Wardee – I’ve been meaning to sprout and love the idea of micro greens as well. Just curious why sunflowers? While natives ate the seeds are the plants themselves really meant for raw consumption? I’d love to know more about your sprout system too and where you get the sprouting and growing seeds from!
xo,
Sustainable Eats
Hello! To be honest, when I started growing these, I was just copying the people at the Farmer’s Market. They grow and sell buckwheat and sunflower microgreens. So I did, too. But in addition to that, at the time I was reading “The Sprouting Book” by Ann Wigmore and she suggests sunflower for sprouting. Here I am quoting from her book:
I prefer them over buckwheat greens, on the grounds that they are thick and hearty and much easier to pick and clean. 😉
I wrote up how I grow them here: https://traditionalcookingschool.com/2008/07/22/how-to-grow-microgreens/
We’re about ready to start growing them again. Took a break over the winter. I like growing these because it adds greens to our salads, so we’re not just having sprouts for salads. Although, technically, they are sprouts, too. But they’re big and green and leafy, so it seems like greens, which makes our salads more interesting.
I buy them through Hummingbird Wholesale in Eugene, OR.
Up at the end of this post, there’s a list of all the things I’ve written about sprouting, so browse through those and let me know if you have questions. I am working on a complete resource for sprouting, but for now, most of what I’m compiled is in that list.
Wardee, You can grow your microgreens all year long on your window sills. Go to lowe’s and for free get the long 6 compartment containers that small flower plants come in for store delivery. Make sure to clean.
The peas or speckled peas are the easiest and they do not go bad as fast in the fridge. They last a week to 2 weeks. They taste like the sunflowers to me. And the seeds for the most part stay down in the soil. The sunflowers can take awhile to pull off all the hulls if they don’t rinse out well. But they are my favorite. The speckled peas are second and I don’t really like buckwheat. They go bad fast.
I recently started sprouting flax seed. It is very easy. I fold a napkin on the bottom of a plastic tray and wet it . No standing water. I spread out the flax seeds and cover the tray. If it needs water after 3-4 days I add it. That’s it in a week they are 2-3 inches tall. I pull up what I need, roots and all. NO dirt or yuck. /sometimes near the end I have to pull away the napkin. That’s it!