The cheese-lover or cheese-maker in you might be hankering after a cheese press. Even if you don’t really need a cheese press, you might want one. They are convenient — and if you’re making cheese often, a press can be a big help.
We love our homemade cheeses! Raw cheeses are cultured foods that begin with raw dairy and boast so many health benefits.
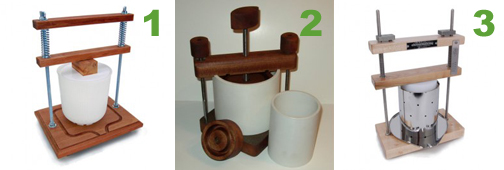
Although there are many retail options for cheese presses, I’ve selected three to review today. These are available from my favorite online merchants, Cultures for Health and Homesteader Supply. Please note that none of these are of the Dutch style press, which uses a lever system for pressing.

Before I get into each one, let’s break down the main components of a press. I’ll evaluate the three presses based on these qualities.
- Drip Setup. When cheese is pressed, whey flows out. How does the press handle this? Usual choices are through drip channels or a drip tray. You’ll need to add your own pan in front of the press to catch what flows off. Some presses fit easily inside a pot or baking tray.
- Mold. This is the container that shapes the curds into a block of cheese. An important factor is material — food-grade plastic or stainless steel are the usual choices. Another issue: will it accept other molds should you want to change in the future?
- Blocks/Followers. These connect the top of the cheese with the weight system of the press, allowing the cheese to be pressed. Personally, I look for blocks and followers that are long enough to reach way down in the press so that even a small block of cheese can be pressed.
- Size. Yield is an important factor here. How much cheese will you be making? 1 gallon of milk usually yields about 1 pound of cheese. Personally, I make cheese from 2 to 4 gallons of milk (which is what my biggest pot holds), so I look for a mold that accommodates 2 to 4 pounds of cheese.
- Weight System. How precise is the weight system? How easy is it to use? In the style of presses featured here, the pressure loosens and you must adjust the press as you go along. What happens is the cheese gets smaller and shorter, but the press stays in the same position — thus the pressure on the cheese gets relieved, and you need to come in and tighten it up again.
Now let’s talk about those three presses. I own #3, and while I have not held the other two in my hands, nor used them, I have carefully reviewed their features in order to draw an opinion. I feel confident in offering any of the three as options for you, whether for general use or for use in the Cultured Dairy and Basic Cheese eCourse. I will list the presses and describe their features.
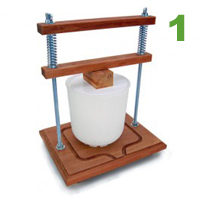
Press #1: Basic Press at Cultures for Health
$129.99 retail (at time of posting), or 10% off as part of Cultured Dairy and Basic Cheese eCourse Supply Kit.
- Drip Setup. This press has grooves in the wood for the whey to flow out the front and onto whatever pan you put down to catch the whey. The wood is treated with olive oil.
- Mold. Does not include a mold, but fits a variety of molds. If purchased with the Cultured Dairy and Basic Cheese eCourse Supply Kit, we add a simple food-grade plastic 800g mold to your order. This mold is good for up to a 2 pound block of cheese or so (2 gallons of milk). If your cheese yield is low, the follower plate (fits on top of the cheese giving it a flat top) won’t easily slide to the bottom areas of the mold. I recommend filing off about 1/16” all around so it will float freely up and down in the press.
- Blocks/Followers. This press’s block is approximately 4” long by 1” thick x 1” wide. This may or may not be a sufficient length, depending on the cheese yield of your milk. I suggest you scavenge for a replacement scrap block of wood that is about 5” x 1.25” x 3.75”. The last two measurements can decrease some, but 5” long is just about right for maximum versatility.
- Size. Depends on which mold you choose to use. With the plastic mold included with the eCourse supply kit, you can make up to a 2 pound block of cheese or so (2 gallons of milk).
- Weight System. This press requires you to turn the wing nuts to apply pressure; each turn is approximately 2 pounds of pressure. While not being as precise as some presses, pressing cheese is not an exact science. You start with a little pressure and increase it bit by bit until you have the right pressure for the type of cheese you’re making. You learn this over time.
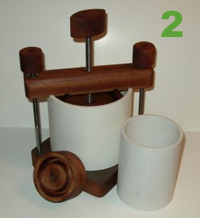
Press #2: Ultimate Cheese Press at Homesteader Supply
Retail: $174.99 (at time of posting). See the press here.
- Drip setup. There are no drip channels or drip tray. The manufacturer recommends putting the mold in a large pot when making cheese, with little mess or fuss. This uses up less counter space.
- Mold. This comes with two hoops (molds) to prepare 1 to 5 pound cheese wheels. The manufacturer says that using plastic instead of stainless steel prevents the cheese from cooling down too fast during pressing. It will not accept other molds, but since it accommodates so many sizes of cheese, I’m not sure that is necessary.
- Blocks/Followers. A follower (pressing plate) connects the top of the cheese with the pressure mechanism of the cheesepress, allowing the cheese to get pressed. This press includes 2 followers; which one you use depends on which mold you’re using.
- Size. The manufacturer claims that you can make a 1 to 5 pound wheel of cheese (1 to 5 gallons of milk). However, I can only fit up to 4 gallons worth of curds in the press, yielding up to 4 pounds of cheese.
- Weight System. This is a press where you tighten until you feel it pressing, and keep repeating this for 12 to 24 hours. While not being as precise as some presses, pressing cheese is not an exact science. Though less precise, it turns out excellent cheese for me every time.
Here’s my video review. See a more complete and updated review here.
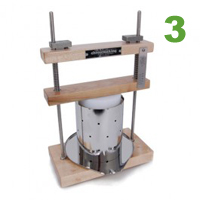
Press #3: Deluxe Press at Cultures for Health
Retail: 279.95 (at time of posting), or 10% off as part of Cultured Dairy and Basic Cheese eCourse Supply Kit.
This is the same press available from Cheesemaking.com.
- Drip setup. This press includes a stainless steel drip pan under its mold for the whey to flow out onto what you put down in front of the press.
- Mold. This press includes a stainless steel mold, good for 2 to 4 pounds of cheese (2 to 4 gallons of milk). It will accept other molds, which I have actually done.
- Blocks/Followers. This press includes two blocks which you probably won’t need to modify. However, I recently asked my husband to make me a new block. He used a 2×4 and cut it to 5″ long (an inch longer than the 4″ block provided with this press). When I’m making smaller amounts of cheese in this large press, the regular blocks don’t reach the top of the cheese with the weight system engaged. The slightly longer block fits the bill!
- Size. With its included mold, this press can make a 2 to 4 pound block of cheese (2 to 4 gallons of milk). It will hold other molds, smaller or larger.
- Weight System. This press is very easy to use. Use the pressure gauge to determine how far to press down on the locks — it will lock into place at the desired pressure. The gauge is not that precise, with increments of 5 pounds marked. I recently put my free weights on top of the press to check the accuracy of the gauge and found it to be off by 3 to 5 pounds. This is not necessarily bad because pressing cheese is something you want to do by feel anyway.
My Pick
This is updated as of 7/31/12.
I think I truly could be happy with any of these three presses. But if I had to choose one press over the other in any of categories, I would choose #2. It is more affordable than #3 (which I really like, too). I like that you don’t have to read numbers on a pressure gauge but can press by feel and end up with marvelous cheese, and that it keeps a smaller space profile by fitting inside a baking sheet or pot for the whey dripping out.
Remember, you don’t need a press for the Cultured Dairy and Basic Cheese eCourse. A simple tome mold and lid will do. A little tip: waxing your finished cheese preserves it and helps prevent it from drying out.
If you do get a press, I hope these reviews have helped, though I don’t claim to be an expert. I’m just a cheese lover like you, learning every day from the adventures in my kitchen!
Do you have a cheese press? Which one? Do you like it? Why or why not? If you’ve made a homemade cheese press, please share the details, too!
We only recommend products and services we wholeheartedly endorse. This post may contain special links through which we earn a small commission if you make a purchase (though your price is the same).


I have this cheese press from Schmidling. It works based on turns of the screw compressing a spring. Two revolutions equals 10 pounds. I can accomodate curds from a 5 gallon batch with the CheesyPress II. I haven’t tried it yet, but I’m excited to give it a whirl in the dairy class!
That looks like a great press, Joy. And quite big! I look forward to hearing how it works for you in the class! Thanks for adding it here.
Hi Wardee. Back in our homesteading days, I used the #2 press shown above, except mine had stainless steel molds. I have one complaint with the wood followers (which had laminate on the underside). When in use, whey would invariably seep around the follower. Of course, I drained off what I could, but over time the wood swelled from the moisture. My husband had to reduce the circumference for me more than once because the swollen follower had gotten too big to fit into the mold.
Hello Milkmaid! The press you are referring to is a press from another company. I had some of the same problems and that is why I designed the #2 press above, which I call the Ultimate Cheese Press. Our Ultimate Cheese Press just came on the market this past January, and is getting rave reviews. One reason is that we don’t use any laminate, only good hardwood that has been treated with all natural raw Tung oil which provides a complete water proof seal. And the design pretty much ensures even pressing. This press can last a lifetime with proper care and re-oiling about once a year, depending upon how much you use it. And, I chose not to use stainless steel molds only because many cheeses like cheddar are meant to kept at a warm temp, which is called the “cheddaring” process. No matter what you do to stainless steel, it cools off too fast. I tried to put as much attention into the details as I could in this design because I wanted a quality product and I like EASY and of course EASY really helps make cheesemaking a fun process.
My husband just made me a cheese press, and we are going to attempt our first batch. Does the radius of the mold affect the pressure that should be applied? What I have is 4″ wide. Most I have seen are 4 1/2″ wide. Does that mean I should apply more or less weight and for more or less time than the recipe calls for? Or does it just mean that I will end up with a taller cheese? Would really appreciate some feedback!
Melissa — As long as you have a flat follower on top of the cheese distributing the weight of the press, the circumference doesn’t matter. That amount of pressure is applied to the whole block. How great your husband made you a press! 🙂
Thank You!!!! Now I can order my supplies!!! Any suggestion on a good website to order the starter and rennet from?
You do need to take into consideration the diameter of the mold. For example some cheddar recipes call for about 8 pounds per square inch ( PSI ). Using a 4 inch diameter mold requires 100 pounds of weight, a 6 inch mold requires 226 pounds of weight. The formula for weight, pressure and area is
PRESSURE (PSI ) = WEIGHT (lbs ) / AREA (square inches )
To get the area of your mold
AREA ( square inches ) = 3.14 x RADIUS (inches) x RADIUS (inches)
RADIUS (inches) = DIAMETER (inches ) / 2
Something I don’t understand, is that almost all recipes I have read say to press at 10 pounds, not 10 PSI. If a recipe says to press at 10 pounds, should I read that as 10 PSI or. . .? There’s a HUGE difference here. And also, when I read a press description and it says it presses max at 80 pounds, is that 80 total pounds or 80 PSI? I can easily add 80 pounds of weight using weightlifting plates and a makeshift press, but 80 PSI would be impossible. Help here, please?
Many cheese making books only give the weight (in lbs ) to press your curds. When they do that they are assuming you are doing a small batch and using a 4 inch diameter mold. If you are doing a larger batch with a larger mold, you will need additional pressing weight to keep the pressure (PSI lbs per square inch) at the correct level.
Wardeh, Could you update again? The link for cheese press #3 is out of date.
Thank you for helping us all!
You are so generous!
Becky,
Looks like they don’t carry it anymore. 🙁
I’m sorry.
This is the one Cultures For Health now carries:
http://www.culturesforhealth.com/cheesypress-cheese-press.html
I have not tried it but it looks like a good press. 🙂
Hi Wardee, I JUUUUST received the Ultimate Cheese Press from Homesteader’s Supply today (8-20-2018), and was wondering if there are any video tutorials on this particular press. Thanks!
Hi Steve,
Wardee did a review/how to on the Ultimate Cheese Press here: https://traditionalcookingschool.com/food-preparation/recipes/techniques-tutorials/the-ultimate-cheese-press-is-updated-new-video/
~Danielle, TCS Customer Success Team
Question; how often do you check the cheese when pressing it for 12 hours?
Hi Steve,
In this video Wardee says to check the press often, when its loose tighten it down: https://traditionalcookingschool.com/food-preparation/recipes/techniques-tutorials/the-ultimate-cheese-press-is-updated-new-video/
I would probably check it every 15 minutes or so. After the first several hours you could let it go overnight once most of the whey has been pressed out.
~ Vicki, TCS Customer Success Team
Why not get a lever press, it stays at the correct weight all night long. Get some sleep!
Bob
Thanks for the tip Bob, I’ll definitely check this out! I’m new to cheese making, and that definitely sounds like it’d make the whole process a lot easier.