

We’ve been learning all about kefir…
How to make kefir ice cream, kefir smoothies, kefir cheese, and now… how to make kefir cheese balls!
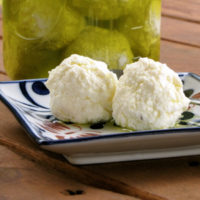
This is a traditional Middle Eastern method of preserving kefir (or yogurt) cheese — called labneh.
The kefir or yogurt cheese is salted and soured first, then fashioned into balls and submerged into olive oil. Because the salting and souring preserves the cheese, and the olive oil acts as a protective brine, this method requires no refrigeration. My family still follows it to this day!
My grandmother and namesake, Tata Wardee, always had jars full of yogurt cheese balls that we would add to our plates at breakfast, lunch, or dinner. They are a great variations from the traditional holiday cheese ball.
Watch the video below, or follow along with the print instructions, to see how to make your own kefir cheese balls! The video is an excerpt from my Cultured Dairy and Cheese eCourse — be sure to check it out for even more information.
Middle Eastern Kefir Cheese Balls (Or Yogurt)
Ingredients
- 1/2 gallon kefir or yogurt
- 1/4 teaspoon sea salt if not already salted, additional to taste
- 1-1/2 cup extra virgin olive oil additional as needed
Instructions
-
First, turn your kefir into kefir cheese.
-
Line a colander with 2 layers of 90-count cheesecloth, then nest colander inside a big pot or bowl.
-
Carefully pour kefir into colander.
-
Tie up the ends of cheesecloth and tuck inside colander.
-
Hang the bag of cheese up over the pot (you can remove the colander) for at least 2 days, until whey no longer drips out and the cheese is quite dry.
-
This hanging time means your kefir may be quite sour.
-
If you're leery of that tang, try it with yogurt instead which will always be more mild -- or if you have cold storage, hang your cheese there to drip out the whey while suspending fermentation.
-
If you have not already salted the kefir cheese, do so.
-
Salt to taste, starting with 1/4 teaspoon.
-
Pour olive oil into jar.
-
Shape kefir cheese into individual balls -- about a tablespoon each.
-
Plunge balls into olive oil one at a time.
-
When all balls are in jar, top off with additional olive oil till balls are completely submerged.
-
Cover tightly.
-
Store in a pantry cupboard.
-
Burp as needed.
-
They keep for a few weeks, at least, under normal pantry conditions, but more likely longer.
Recipe Notes
Serve with eggs or sausage at breakfast, or as a fermented side dish with sandwiches or salads at lunch, or even at dinner on pizza or next to grilled meats and rice! Or, enjoy as a snack with veggies or fruit! The sky's the limit!
Have you ever made kefir cheese balls? Do you have a traditional preservation method from your family to share?
This post was featured in 15 Easy Raw Cheese Recipes and 60 Easy & Nourishing Picnic Recipes
Other Cultured Dairy Recipes & Resources
- How To Make Cultured Butter
- Compound Butter {Butter Gets Dressed Up!}
- How To Make Homemade Buttermilk + 5 Buttermilk Substitutes
- Easy Sour Cream (with free video!)
- What To Do With Soured Cream?
- Cultured Cream Cheese (+5 flavor options!)
- How to Make Raw Milk Mascarpone
- 4 Easy Raw Cheese Recipes
- Raw Cheese Benefits
- Basic Cheesemaking Cultures and Supplies
...without giving up the foods you love or spending all day in the kitchen!

2 free books:
Eat God's Way
Ditch the Standard American Diet, get healthier & happier, and save money on groceries...
We only recommend products and services we wholeheartedly endorse. This post may contain special links through which we earn a small commission if you make a purchase (though your price is the same).

Thanks for the recipe – I have never tried making these cheese balls…yet!
M.E. — You’re welcome! I hope you like them!
This is totally brilliant! I have made yogurt cheese a couple times, but I only strained it long enough to simulate cream cheese. My kids love it. I have been adding garlic and herbs since my kids love it. Can I use cheese balls in this recipe that have had garlic and fresh thyme added? I just like the taste, but I am concerned that something in the herbs might provoke spoilage….What do you think?
I think herbs and garlic would be fine. It is worth a try. Sound yummy! 🙂
I remember reading somewhere that garlic in oil should be refrigerated, as it can react to the oil at room temperature. I have made yoghurt cheese before, but never thought of preserving it, thanks to you and your grandmother, I’ll double my next batch of yoghurt and give it ago.
The concern with garlic is that it can contain botulism (since it grows IN the ground it has a higher chance) and the oil makes it anaerobic. The acidity of the kefir cheese is probably enough to keep botulism from growing- but if you are concerned- you can use dried garlic.
No, I haven’t made them before, but have made the yogurt cheese. Cannot wait to try this and am especially happy that I can store them somewhere besides the fridge!
I will need to make less than you, however, as I get a much smaller quantity of milk for yogurt/kefir making. (I guess I could just buy the best organic yogurt I can find, though?)
If I do make a smaller batch, couldn’t I add to the total as I am able to make more?
Clee — Yes, you can add to the total as you go. 🙂
We tend to eat ours up. 🙂
However, I LOVE this idea to use up extra milk and store it without refrigeration! I hope tp try it this week.
Thanks so much for sharing your grandmother’s tricks with us again. (Those are the best kinds!!! May our children and grandchildren always say its so!) 🙂
Pamela
Pamela — May our offspring say it’s so, too! 🙂
I read something similar on Dom’s kefir making site and I have kefir cheese balls in extra-virgin olive oil that I intend to leave there for 10 years. He said they would taste like blue cheese!
Wow — That’s awesome! It would be hard to wait for 10 years. You’re really going to do that? 😉
If I live that long!
Once you eat these, what do you do with the oilve oil?
Heather — Do what you’d normally do, saute, dressings, etc. It is almost like the olive oil didn’t get used at all previously because it is almost entirely still available, with the exception of the small amount drizzled on the balls. Or, in my case, I use it a little as I go. If I scoop out a few balls of cheese to have with eggs, I drizzle some of the olive oil on my eggs, too.
Do you think you could reuse the olive oil for one more batch?
Rhonda — Yes! But I’d strain it so it is pure again. That way you won’t have any little floaters near the top in the presence of oxygen spoiling.
I just made these this morning — finger licking good! I used a combination of powdered kelp and sea salt for seasoning. They are screaming to me marinara sauce!
Kelly
I’m in the process of making your recipe for raw goat milk hard cheese. It has just one more day to go. Could I store this cheese in olive oil or haven’t you ever tried it?
Yes! I do it all the time. 🙂
Wardee, you’re awesome in every way! 🙂
can I do this withcream cheese?I have many many poundsin t freezer but am moving. I have kefir going too as well as yogurt but my concern is the cream cheese and how long it will store this way?
Hi there,
I don’t think I have anywhere to hang the kefir – can it be left in the bowl for a week at room temperature, for the whey to come out?
Can this method of preserving be used for all types of cheeses – are there any exceptions?
Also how do you store your fresh whey and how long can you store it for?
Thanks
I didn’t think I had anywhere to hang my yogurt to strain and then tied the top of the cheesecloth in to a loop and I hung it from one of my kitchen cabinet knobs. It worked great!
Could I use this method with store bought (my local health food store) Kefir?
You could. I’ve done it with store bought yogurt.
Wardeh, should I assume you had already strained out your kefir grains and then put the kefir back into the jar? My kefir isn’t as thick, it’s more like a drinkable yogurt…… :o\ Am I not letting sit long enough? Thank you for your help!
Elena, yes, I had already strained out the kefir grains. To get thicker kefir, you can do this and let it sit out another 24 hours (in regular temps). How long is your initial ferment? I usually go about 24-36 hours (in normal temps).
What do you do with all the whey that is drained off? Thanks
You can use the whey for soaking grains, ferments, or even as a probiotic drink. One of my daughter’s finds that having a ‘shot’ of whey each day helps with tummy troubles. Whey can also be given to animals (dogs, cats, chickens, etc). It keeps for sometime in the refrigerator.
Have only been making kefir for drinking – gave these a go this week and the cheese is ready today! Tastes exactly like goats cheese – lucky for me as it’s my favourite! Love your site and your advice – your Idiots Guide to Fermenting is my bible – Now off to try some sauerkraut now my airlocks have arrived 🙂
can’t wait to try it
Ann Rayburn Rohde
Its good
Very cool!
Julia Mac – no fridge required!
awesome….
Love this!!!
looks good anyone try it,i never had it
Yes!!! It is delicious! Just finished up a jar of kefir cheese balls with garlic and rosemary in the jar.
That answers what I was going to ask – I made some rosemary infused olive oil and wanted to know if it would work!
I know I like the cheese curds in the cheese shop that are in the herb and garlic oil.
Can’t wait to try these 🙂
Making yogurt so I can try these!
Ok! Finally made a successful batch of yogurt! A whole gallon of it! No worries. We’ll use some for smoothies, some for soaking grains, and the rest for making Yogurt Cheese Balls! Yippee! And I love that it is shelf stable. 🙂
they keep really well although I am the only one who likes them..
Thank you!
Goodie!
Mine looked amazing at first, but overnight they puffed up and floated to the top. By morning, I had a mass of yogurt at the top. What did I do wrong?
Looks good! Can the olive oil be reused for future batches?
that is so simple. I will be trying that with my greek yogurt. thanks
I am going to try these now. I have a few extra jars of kefir in the fridge this week, so I am looking forward to this. I like that you can still use the leftover olive oil, as you normally would. Thanks!
Cool! I got tired of my kefir making so much kefir – so I put it on time out – this is inspiring! Btw, where do you buy your olive oil from? I see its a big jug! 🙂
Hi Angelica,
Wardee answered your question in today’s podcast: https://traditionalcookingschool.com/2014/10/31/kyf-090-curly-hair-styling-more-listener-questions/
Made some of these this morning. I just used a quart of kefir until I know if I’m going to like them. Are they ready to eat as soon as you get them in the olive oil or do they need to sit for a few days?
I have a small bar & restaurant and we serve some locally made milk cheese that is typically balled up and rolled in herbs. We get batches every couple weeks, freeze half and thaw as needed. What I’m wondering is if we could instead store them in olive oil at room temp (or refrigerated) and serve from there? And if so, how long will they stay good? And will the olive oil need to be disposed of or could I just keep adding more balls to it and strain it monthly or so?
I have attempted to make these kefir cheeseballs a handful of times.
So far ALL tries have resulted in cheeseballs that either all floated to the top of the jar which resulted in a mass of cheese. I have to strain the oil and just use the cheese as a spread.
Or a couple of other times, the balls fell apart, and also had to strain the mass and eat as a spread. What could I possible doing wrong?
Hi Amy,
The cheese must be VERY dry before making into balls. You may need to hang it for a couple of days to achieve this dryness (you can hand in the fridge so it doesn’t become too tart). Then make sure the balls are very tight when you are forming.
Millie
Traditional Cooking School
Thank you for replying Millie. I did that very thing… I thought I had it too dry and that is why it crumbled overnight in the olive oil. I then tried it a tad wetter and they all floated to the top and became a collective one lol. Must be a sweet spot?? So frustrating. I have tried this 5x with no luck.
I made these this morning. My kefir hung for two days. I salted and formed into balls. I placed in a jar with olive oil, layering. Tonight, I nearly had an explosion. It was bubbling like a rapid boil. Olive oil really shined up my wooden cupboard. Also ruined some items on the same shelf and below. My mistake? Only watching the video and not reading the blog post and recipe. Burping is important. Or utilizing pickle pipes or other fermentation lids to make life less….. explosive.
I have now dumped what is an absolute mess into a larger jar. I am throughly disappointed with myself as I know better.
Hi. I have never purchased kefir. Which brand or type do you recommend? This recipe reminds me of my late grandmother. Thank you for sharing!!
You’re welcome, Suzanne! Wardee makes her own kefir using dairy kefir grains from Cultures for Health. Here’s a link to a resources page on the blog: https://traditionalcookingschool.com/tools/new-fundamentals-resources/
Scroll down to Cultures for Health and click on that link to see what they have to offer. Please let us know if we can help further! —Sonya, TCS Customer Success Team